e-supply basic
1. Introduction
This document explains the basic (manual) mode of the e-Supply (purchasing card) solution.
For more detailed information on integrating the automatic modes, please refer to the Advanced e-Supply Integration Guide (pdf).
2. Account Registration and Access
There are two environments on our platform: a test environment and a production environment:
-
Our production environment is the (paying) environment where suppliers submit orders / transactions with the intention of connecting to their card acquirers and receiving payments from their customers.
-
Our test environment works almost identically to our production environment, except that we do not send the transactions to the card acquirer or charge you. Our test environment allows you to submit test orders/payments and change/fine-tune your account configuration.
Depending on who registers your account, the account will either be created directly in the production environment, or it will be created in the test environment and when you are ready to go live, it will be transferred to the production environment.
2.1 Financial registration
Worldline Purchasing Card solutions are distributed by financial institutions active in the Purchasing Card business and together we have set up automated procedures to facilitate the supplier account registration.
The financial institution will create the Worldline account for you. Once created, you will receive an email with your login name (PSPID) and a separate email with your password.
The financial institution generally creates your account directly into the production environment, as they also take care of most part of the account configuration.
3. Account access
When you receive your password for your account by email, you have to log in to your account to access its back-office menu.
Important
|
The environment to be logged into is stated immediately above the login form: "Identification (Test)" or "Identification (Production)". The environment can be changed by clicking the link just below the login form: either "Prod login" or "Test login".
The login form can be set to 3 or 2 fields with the "User login"/"Return" button on the right-hand side of the login form. The 3-field form ("UserID", "PSPID" and "Password") is for a user login. A UserID is the identifier of a specific user for an account (PSPID) in which different users are registered. If your account has only one user, you can log in using the 2-field form: "PSPID" and "Password".
If you have forgotten your password, click "Change password" under the User Info icon on the upper-right hand corner of your Back Office account and follow the instructions. You will be asked for your current password, and to enter and confirm your new password. A password strength indicator is there to measure the strength of your new password. The color bar indicates whether a password is Very weak (red), Weak (orange), or Good (green). Click "Submit" when you have completed the above.
Note:
- Choose a new password in accordance with the following rules:
- You can change your password only once in 24 hours.
- Your password should reach the strength level ''Good''.
- Your password cannot start with the character ''<''.
- Your password length must be between 10 and 128 characters.
- Your password must contain at least 1 lowercase letter (a-z), at least one uppercase letter (A-Z), at least 1 number (0-9) and at least 1 symbol (&,@,#,!, etc.).
- Your password must not contain your PSPID, your USERID or our company name.
- Your new password must be different from your last 12 passwords.
4. The back-office menu
4.1 Logoff and logon
You can log out of the session by clicking "Log out" under the User Info drop-down. This option allows you to interrupt and restart a session in the Back Office module.
4.2 Configuration
4.2.1 Password
The "Change password" under the User Info icon on the upper-right hand corner of your Back Office account allows you to modify your password. You will be asked for your current password, and to enter and confirm your new password. A password strength indicator is there to measure the strength of your new password. The color bar indicates whether a password is Very weak (red), Weak (orange), or Good (green). Click "Submit" when you have completed the above.Note:
Choose a new password in accordance with the following rules-
- You can change your password only once in 24 hours.
- Your password should reach the strength level ''Good''.
- Your password cannot start with the character ''<''.
- Your password length must be between 10 and 128 characters.
- Your password must contain at least 1 lowercase letter (a-z), at least one uppercase letter (A-Z), at least 1 number (0-9) and at least 1 symbol (&,@,#,!, etc.).
- Your password must not contain your PSPID, your USERID or our company name.
- Your new password must be different from your last 12 passwords.
The above rules also apply to new user accounts (including API users) that are being created and existing passwords that are being modified. For added security, you can also activate two-factor authentication. Click here for more information.
4.2.2 Account
You can check and modify your account’s administrative parameters via the Account link.
-
Account holder contact information: company name, telephone number, e-mail address, etc.
-
Subscription type: indication of your subscription type and the options you have selected for your account.
-
Catalogue languages and URL: indication of the various languages in which you want to be able to display the payment page, and a possible URL for the general conditions (only visible for accounts with e-commerce 3-tiers access).
-
Currencies: indication of the currencies in which you wish to accept your customer’s payments, and which are accepted by your acquirer (only visible for accounts with the multi-currency option).
-
Billing/Invoicing information: your invoicing details (invoicing address, VAT number and payment method you wish to use to pay our invoices).
4.2.3 Payment methods
You can activate/deactivate and customise the payment methods in your account via the "Payment Methods" link.
For some payment methods you need to have an affiliation number (UID, SE number, etc.) with an acquirer in order to activate the payment method in your account. In your back office, you can add new payment methods to your payment method list. For some payment methods, you may need to click the "Maintenance" button next to the payment method to display its configuration page, where you can enter the affiliation details provided by the acquirer.
Most payment methods will only be activated (by our Customer Care team) after receipt of an e-mail from the acquirer confirming the affiliation number. Once the payment method has been activated and is ready to use, you will receive a confirmation e-mail. The time required for this activation process depends on the acquirer.
4.2.4 Users
The Users link gives enables you to access the user management module, where you can create new users, edit existing users, send a new password to users, etc.
For more information on user management, go to User Manager.
4.2.5 Customers/Cards
The Customers/Cards page enables you to manage your customer relationships and configure their cardholders (employees).
4.2.6 Support
In our Support section, you can find:
-
A page where you can download user guides and technical documentation.
-
Frequently asked questions.
-
Latest updates of our platform.
-
Our contact details.
4.2.7 Technical information
You can configure the technical integration parameters for your account via the "Technical Information" link. For more information, go to Technical information.
4.2.8 VAT Rules
The "VAT rules" link in your back-office menu leads to a page where you can configure your VAT rules. Please refer to this page for more information on how to set the VAT rules.
4.2.9 Catalogue
The "Catalogue" link in your back-office menu leads to a page where you can add/edit/delete items in your online catalogue. For more information, go to Arrange your catalogue.
4.3 Operations
4.3.1 Financial history
You can view and check the statuses of your payments and perform global accounting reconciliations via the "Financial history" link. For more information, go to Consult your transactions.
4.3.2 New order
You can manually submit a new order/payment via the "New order" link. For more information, go to Submit new orders.
4.3.3 View transactions
You can view and check the status of your transactions and perform maintenance operations on your transactions via the "View transactions" link. For more information, go to Consult your transactions.
4.3.4 New file (Batch option)
You can manually upload a new payment file via the "New file" link. For more information, go to Advanced e-Supply.
4.3.5 View files (Batch option)
You can select and consult your uploaded payment files via the "View files" link. For more information, go to Advanced e-Supply (pdf).
4.3.6 Electronic reporting
In the Electronic reporting page, you can set the format and structure you want to use for electronic reports, such as file downloads.
Specific fields will be returned in your file download depending on the file structure. A choice of four different file structures is available: Standard, Extended, File Management and Dynamic. You can also choose between three different return formats: XML, fixed-length and delimited.
For more information on electronic reporting, please refer to the Support section of your Worldline account: Integration & user manuals > User guides > Description of the downloaded payment files.
To change the file format for a specific user in your account, click the "Users" link in your back-office menu. Click the "Edit" button next to the user whose file format you want to change. In the user configuration page, you will see a "File format" link to access the user's electronic reporting page, where you can make the changes.
When push-reports are activated in your account, the "Electronic Reporting" link will give enable you to access a list of your push-reports.
4.3.7 Credit note
You can submit a new credit note (refund) manually via the "Credit note" link. For more information, go to Submit credit notes.
4.3.8 Online Merchant Services
Online Merchant Services (OMS) is a free web-based payment reconciliation tool from American Express that gives you secure and easy access to your statement information.
OMS is designed to help you keep track of payments and submissions, making it easier for you to manage your American Express account.
Please refer to American Express for more information on this service. OMS is currently not directly available in the Worldline back office.
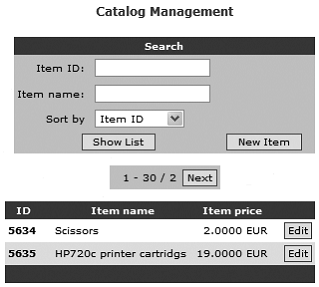
5. Arrange your catalogue
Your account contains a web-based catalogue. The items you decide to display in your catalogue can be added manually or automatically.
The "Catalogue" link in your back-office menu leads to the page where you can add, edit or delete items in your online catalogue.
5.1 Add items
In your Catalogue Management page ("Catalogue" link in your back-office menu), click the "New item" button to add a new item to your catalogue.
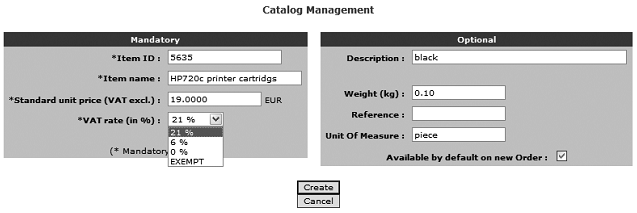
There are several fields to complete. The fields marked with an asterisk (*) are mandatory fields.
Try to avoid using special characters in the item fields. (e.g. ‘,’ , ‘<’, ‘>’ , etc.).
| Field | Explanation |
|---|---|
| Item ID | Identification name/number of the item. The item ID needs to be unique in your catalogue. |
| Item name | Short name/description of the item. |
| Standard unit price | Item price (in the catalogue currency, as displayed next to the text box). The price is exclusive of VAT. The decimal separator needs to be "." (not ","!). |
| VAT rate | Indicates the VAT rate you wish to set for this item (in %). |
| Description | Description or details of the item. |
| Weight | Weight of the item, in kg. If not relevant enter "0". |
| Reference | Specific/extra supplier reference for the item. |
| Unit of measure | Free unit of measure for the item (e.g. box, 500 sheets, piece, etc.). |
| Available default on new Order | If you tick this box, this catalogue item will be present by default in every new order you enter via the "New order" link in your back-office menu. |
Once you have filled out the necessary details, you can add the item to your catalogue by clicking the "Create" button.
5.2 Edit and delete items
In your Catalogue Management page ("Catalogue" link in your back-office menu), you will see a list containing the first items in your catalogue. To scroll the items in your catalogue, you can either use the "Next" button until you reach the item you want to consult, or you can use the Search fields to look up the item using the Item ID or the Item name. When you have reached the item you want to edit or delete, click the "Edit" button next to the item to enter the item’s configuration page.
To change the item configuration, change the necessary fields and click the "Modify" button to save the changes.
To delete the item in your catalogue, click the "Delete" button.
6. Configure customers and cardholders
You can manage your customers via the "Customers/Cards" link in your back-office menu. The "Customers/Cards" link leads to the page where you can add, edit, deactivate and configure your customers and their cardholders.
6.1 Add, accept and deactivate customer companies
It is possible that the necessary connections with customer companies have already been activated on your account. The "Customers/Cards" link in your back-office menu leads to the Customer management page, where you will have an overview of all added customers.

6.1.1 Add customers
If you need to add a customer in order to request a connection with a customer, select the customer in the "Request link to" drop-down list and click the "Request" button. The drop-down list only shows customers from your own country. If you also want to select customers from other countries, you can click the "Other country" button just below the drop-down list and then select from the drop down list again. It will now contain customers from all countries.
For privacy reasons, American Express customers are not visible in the drop-down list. American Express customers need to be added to your customer list by American Express, nostro team di vendita or (very rarely) the customer himself.
If you do not find your customer in the drop-down list, this means the customer has not yet been registered on our platform. You can click the "Propose a new company (Customer)" button to ask us to add the new Customer company on our platform. Complete the customer details in the page that will be displayed and click the "Create" button. We will receive your request and process it. The mandatory fields are: the company name; address; VAT number; the type of purchasing card they use; and the ClientID. The ClientID in this case is the name/ID you would like to have displayed for this customer in our system.
6.1.2 Customer entry statuses and possible actions
When requesting a link to a customer, the customer entry status will be set to "Active" or "Selected by merchant" depending on the customer configuration.
There are three possible customer entry statuses:
| Explanation | Possible actions (buttons) on the entry |
|---|---|
|
The customer has been added and accepted/activated on your account. You can process orders for this customer. Status: Active |
|
|
The customer has been selected by the supplier. This connection still has to be accepted. You cannot configure any cardholders or process orders for this customer until it has been accepted ("active" status). Status: Selected by merchant |
|
|
The customer has selected you as a supplier. This connection still has to be accepted (by you). You cannot configure any cardholders or process orders for this customer until it has been accepted (status "active"). Status: Selected by merchant |
|
If you do not want customers to be able to request a connection with your supplier account, you can click the "Refuse" button at the bottom of the Customers management page next to the line "New customers are allowed to request a link with this account" line. The account will then be made invisible for all customers except the ones you have added to your customer list.
Conversely, if the account is invisible and you would like to make it visible for all customers and allow customers to request a connection, you can click the "Make visible" link at the bottom of the Customer management page next to the "This account is invisible to new customers" line.
6.2 Add cardholders
You can configure cardholders for a customer when the connection status with this customer is "Active". Click the "Cardholder" button in the customer entry in your customer list to add a new cardholder or change an existing one.
In the Cardholder management page, click the "Define a new cardholder" button to add a new cardholder.
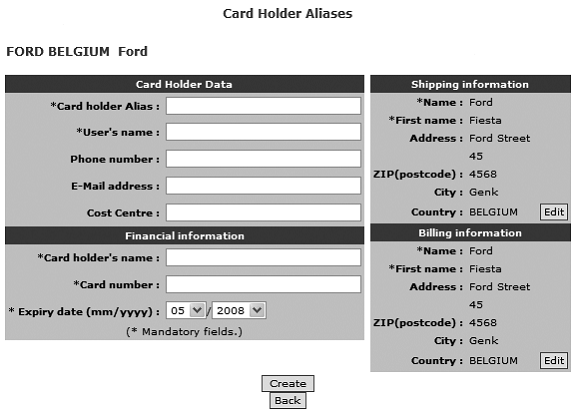
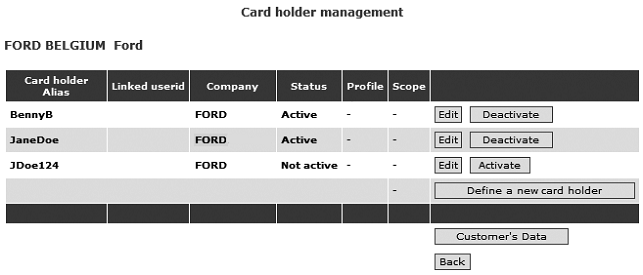
A cardholder's status can be "Active" or "Inactive". You can only send in a new order for cardholders whose status is "Active". You can change the status of a cardholder by clicking the "Activate" or "Deactivate" button in the cardholder entry in the cardholder list. When you deactivate a cardholder, he will stay in the cardholder list, but his status will simply change to "Inactive".
The "Customer’s data" button leads to the customer management page, where you can consult/change the client details and the default delivery and invoicing information for the customer.
7. Submit new orders
Once your account is active, and you have filled in your catalogue and have activated customers and cardholders, you can start submitting orders for these customers.
You can submit a new order via the "New order" link in your back-office menu.
7.1 Select the customers
There are two ways to select the customer for whom you want to enter an order. You can either: simply select your customer in the Client drop-down list and click the "Select" button; or you can enter the card number of one of the customer’s cardholders and click the "Search" button.
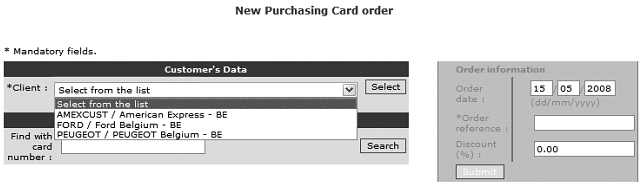
Once you have selected the customer, you can select the cardholder from the cardholder alias drop-down list. If you have not configured any cardholders, the cardholder alias drop-down list will not appear.

You can find the following fields in the order information screen:
| Field | Explanation |
|---|---|
| Order date | The date on which the customer placed the order. The default value is the current date, but this value can be changed if necessary. |
| Order reference | The reference for the order. You can use this reference to look up the order in the Worldline transaction list. |
| Invoice number | Unique invoice reference. You will only see the invoice number field when your account is configured to work in "Sale". |
| Discount (%) | Discount rate in % applied to the whole invoice. You can enter "0" if not applicable. |
Clicking on the "Submit" button will take you to the next page where you can enter the order details. If you want to start again, you can click the "Reset" button.
7.2 Enter the order items
All of the catalogue items for which you have ticked the "Available by default on new order" box are displayed by default upon entering the order page.
You can remove an item from the order by clicking the "Delete" button. To add an item to the order, you can either enter an item ID or an item name and click the "Search" button. You can also add a blank line to the order which you can fill out at will, without selecting items from your online catalogue.
All item details will be initialised with the details you entered when adding the item to your catalogue. You can change these details in the order if necessary. This will only have an impact on the order and will not update your catalogue. The only parameters you need to enter per line are the necessary quantity and potentially the discount rate. This line-item level discount rate will be added to a possible global discount rate.
The global discount rate can be entered/changed in the Discount field in the "Order information" screen.
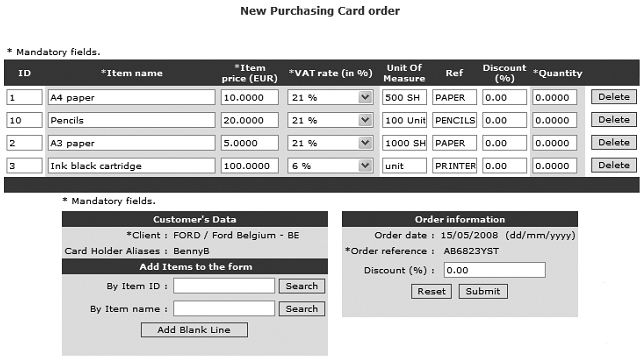
| Note: The decimal separator is "." (a full stop), not ",". |
Click the "Submit" button to continue. If you want to start over again, you can click the "Reset" button.
7.3 Delivery, invoicing and personal information
Submitting the order item details will take you to a page where you can change/enter delivery, invoicing and personal information, as well as certain order references.
The delivery and invoicing information will be initialised with the details you entered when registering the cardholder in your account.
Some of the personal information fields will be initialised with customer details you have configured in the customer management page.
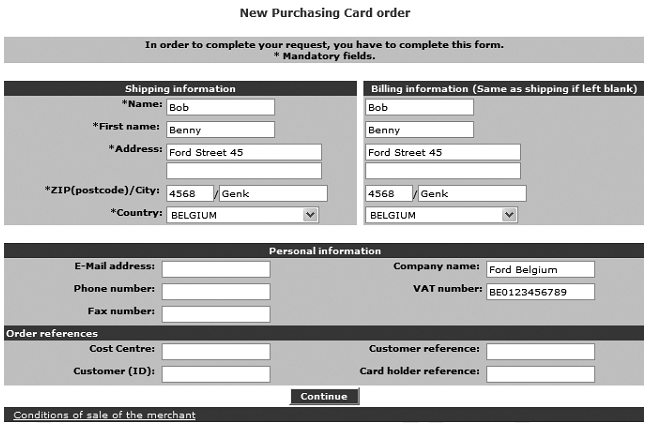
|
Important The order references Cost Centre, Customer Reference, Customer ID and Cardholder reference are not indicated as mandatory, but might be important fields for some customers. Your acquirer and/or customer could ask you to consider some of these fields as mandatory when entering an order. |
Click the "Continue" button to proceed to the next step.
7.4 Confirm the order
You will get an overview of the order item details and the VAT charge. If you selected a cardholder when starting the order, the cardholder details will be initialised in the payment detail fields. You can change these payment details if necessary.
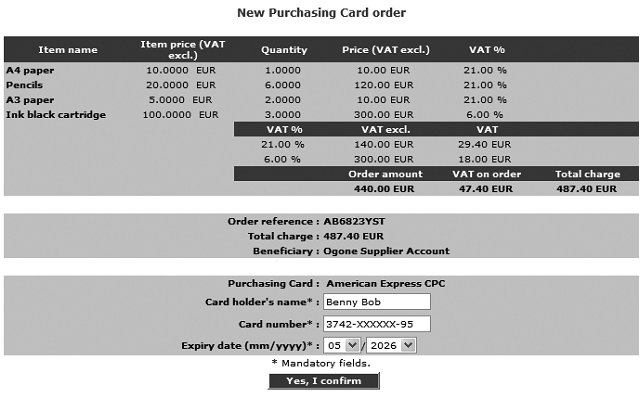
Click the "Yes, I confirm" button to continue. This will have a different outcome depending on your account configuration:
-
Authorisation
When you configured "Authorisation" as the default operation code (for more information, see the "Global transaction parameters" tab, "Default operation code" section of the Technical information page in your account and Default operation code in this guide), the order will be authorised at this stage, but you will still have to perform the data capture (payment request) afterwards.
The "Authorised" message will be displayed in the next screen. The status in the back office for this order will be "5 - Authorised".
For more information on how to perform a data capture (payment request), go to Perform payment demands.
- Sale
When you configured "Sale" as the default operation code (for more information, see the "Global transaction parameters" tab, "Default operation code" section of the Technical Information page in your account and Default operation code in this document), the payment for this order will be requested straight away (providing the authorisation request was successful).
The "Your payment is accepted" message will be displayed in the next screen. The status in the back office for this order will be "9 - Payment requested".
7.5 Email feedback
You can receive a payment confirmation email from our system for each transaction. You can configure this option in the "Transaction e-mails" tab, "E-mails to the merchant" section of the Technical information page.
7.6 Interrupted order
If for some reason you interrupt your order, the operation will be registered with a status "0 – Invalid or incomplete". When you look up the transaction afterwards you will see a "Modify order" button at the bottom of the page. When you click on this button, you can modify the order details and complete the order.
8. Performing special operations
Requesting authorisation implies checking the validity of a card/account and the amount of money available on it. Each acquirer can then reserve the specific amount of money requested on the customer's card/account for a predefined period of time and for a specific supplier.
There are currently two types of authorizations: Pre-Authorization (PAU) and Incremental Authorization (INC). The PAU allows funds to be reserved on the customer's card, while as the INC allows additional funds to be reserved on the customer's card. An Incremental Authorization can only take place after the completion of a Pre-Authorization.
Besides requesting authorisation, our system also allows you to delete and renew authorisations and perform manual authorisations. The latter two operations are only possible for purchasing/credit card payments.
8.1 Delete an authorisation
Whenever a transaction is authorised, it means the acquirer is reserving a specific monetary amount on the customer’s card/account (or the request is matched against a blacklist), to be paid to you when the payment is requested. Although our platform allows you to delete an authorisation, not all acquirers support this type of operation.
To delete an authorisation via our platform, look up the transaction via the "View transactions" selection screen and click the "Delete authorisation" button at the bottom of the order details page. We will simulate the authorisation deletion in any case, even if the acquirer doesn’t support this operation.
8.2 Renew an authorisation
An authorisation’s validity period depends on the acquirer. In the transaction details, you will see the days remaining before the authorisation for each transaction actually expires. This number of days is given as an indication only. In the contract with your acquirer, you will find the exact authorisation period.
If the authorization has not been followed by a data capture (payment request) within the predefined timeframe, the authorization will be displayed in red, meaning it has expired. The guarantee to the supplier - that the money is still available for him on the customer’s card/account - no longer exists.
You could request the payment anyway (without a valid authorisation), but the payment may be refused (e.g.: in the event of insufficient funds).
Before requesting the payment, you can renew the authorisation in your back office. This means you are requesting the acquirer to reserve the money for you once again. However, it is possible that the cardholder has used his card in the meantime and that there are no longer sufficient funds for you to be paid.
To renew an authorisation, look up the transaction via the "View Transactions" selection screen and click the "Redo authorisation" button at the bottom of the order details page (if the button is not immediately available, click the "Advanced" button first).
You can also update only a part of the original amount. If you wish to do so, fill in the partial amount in the field next to the "Redo authorisation" button (the full amount will be initialised by default), before you click the button.
| Important for suppliers who have activated the B2C cards option
If the original authorisation was obtained with the 3-D Secure protocol, the original 3-D Secure conditions might no longer apply to the renewed authorisation. In accordance with the VISA International and MasterCard International Regulations, the customer has to identify himself for each authorisation in order to benefit from the 3-D Secure guarantee. The 3-D Secure conditional payment guarantee rules are exclusively managed between the supplier and his acquirer. Please contact your acquirer for further information. |
8.3 Perform a manual authorisation
Sometimes the acquirer does not issue the authorisation automatically, e.g. when you have reached your allowed transaction limit. The acquirer will refuse the authorisation and return a message asking you to contact the acquirer merchant call centre. When you contact the acquirer and he decides to issue the authorisation, he may give you an authorisation code over the phone.
You can enter the authorisation code the acquirer has given you over the phone (or via fax, etc.), in your back office. Look up the transaction via the "View Transactions" selection screen. When you invoke the transaction details, you will see a "Manual authorisation" button at the bottom of the page (if the button is not immediately available, click the "Advanced" button first). Enter the authorisation code the acquirer has given you in the field next to the "Manual authorisation" button and click the "Manual authorisation" button.
You can also request a manual authorisation for only a part of the original transaction amount. If you wish to do so, fill in the partial amount in the field next to the "Manual Authorisation" button (the full amount will be initialised by default), before you click the button.
| Important
The supplier bears full responsibility for the manual entry of the authorisation code, even if the transaction is in status 9 afterwards and no actual payment is performed |
| Important for suppliers who have activated the B2C cards option
If you have a 3-D Secure contract with your acquirer, the 3-D Secure conditions which apply for a standard authorisation issued via the 3-D Secure protocol could differ from those for a manual authorisation. In accordance with the VISA International and MasterCard International Regulations, the customer has to identify himself for each authorisation in order to benefit from the 3-D Secure guarantee. The 3-D Secure conditional payment guarantee rules are exclusively managed between the supplier and his acquirer. Please contact your acquirer for further information. |
9. Perform payment demands
When your payments are processed using the "Data capture by the merchant (manual or automatic)" payment procedure (see the "Global transaction parameters" tab, "Default data capture (payment) procedure" section of the Technical Information page in your account), an action is required at your end when the status of your transactions is "5 - authorised". An authorisation is only a reservation of the amount on your customer’s card/account or a match against a blacklist, it does NOT constitute a payment.
To capture a payment manually, first look up the transaction via the "View Transactions" selection screen, then click on the "Confirm Payment (data capture)" button at the bottom of the order details page.
| Important
There is a "Last one" box next to the "Confirm Payment (data capture)" button. You can leave it selected in the following situations:
You should deselect the "Last one" box next to the "Confirm Payment (data capture)" button in the following situation:
|
When you click the "Confirm Payment (data capture)" button, you will revisit the pages you saw when submitting the order. The only additional information you will need to enter is the Invoice number for the order. All of the other information simply needs to be confirmed. If however you only want to capture part of the invoice (you disabled the "Last one" box or you previously performed a partial capture and are now capturing the remainder), you need to modify the order items list to only display the ones you want to capture at this point. Example: You have an order for 10 scissors, 5 ink cartridges and 20 pencils. You are currently only delivering 5 scissors and 5 ink cartridges. When you confirm the payment and you revisit the order details page, you can delete the line with 20 pencils and change the quantity in the scissors line to 5).
Once the data capture has been submitted, a new line will appear in the transaction details indicating status "91 - payment processing". Once we have received a confirmation of the data capture from your acquirer, the status will change to Status "9 - payment requested". This status means we have requested your acquirer to take the money that had been reserved or matched against a blacklist and transfer that amount to your bank account. As it is your acquirer who transfers the amount to your bank account, we are unable to say exactly when you will receive the payment.
The Invoice number will be visible in the "Merch ref" column in the transaction details. You can click the Invoice number to display the invoice details.
10. Submitting credit notes
There are two ways to refund a payment (submit a credit note), depending on whether the original transaction/invoice was registered in the Worldline back office or not.
10.1 Original invoice not registered
You can submit the credit note via the "Credit note" menu option. No information will be initialised for this credit note. You need to enter the order reference, the original Invoice number and the Credit note number. When you initiate a credit note for an order which has not been registered in the Worldline back office, you will also need to enter the order details in each screen, in the same way as for a new transaction.
10.2 Original invoice registered
Look up the transaction via the "View Transactions" selection screen, then look up the "Refund" button at the bottom of the order details page.
|
Important There is a "Last one" box next to the "Refund" button. You can leave it selected in the following situations:
You should deselect the "Last one" box next to the "Refund" button in the following situation: You only want to refund part of the order for now and refund the remaining items at a later stage. |
When you click the "Refund" button you will revisit the pages you saw when submitting the order. The related order reference and the original Invoice number will already be initialised. The only additional information you will need to enter is the Credit note number for the order. All other information simply needs to be confirmed, unless you only want to refund only part of the invoice (you disabled the "Last one" box), in which case you need to modify the order items list to only display the ones you want to refund at this point.
Once the refund has been submitted, a new line will appear in the transaction details indicating Status "81 - refund processing". Once we have received confirmation of the refund from your acquirer, the status will change to Status "8 - refund".
The Credit note number will be visible in the "Merch. ref." column in the transaction details. You can click the Credit note number to display the credit note details.
11. How to consult transactions
You can consult and manage your transactions in the Operations section of the back-office menu, regardless of the mode used to send us these transactions. Transactions in the back office are updated in real time.
You can search for a transaction via two links in the "Operations" section of your back-office menu. You can use either "View transactions" or "Financial history".
To look up transaction results in a more automated manner, you can use a server-to-server request (a direct query via DirectLink) or an automatic transaction result file download (AFD via Batch). Please refer to the DirectLink and Batch documentation for more information.
Additionally, you can configure the notification of offline status changes in the "Transaction feedback" tab, in the "HTTP request for status changes" section of the Technical information page of your account (for HTTP requests) or in the "Transaction e-mails" tab, "E-mails to the merchant" section of the Technical information page (for e-mails). In this way, you can be notified by e-mail and/or http request when a transaction status changes to offline in our system.
11.1 View transaction vs Financial history
The "View transactions" page allows you to select and view transaction data. The "View transactions" section is mainly used to locate a specific transaction and potentially perform maintenance on it, (e.g. perform a data capture on an authorised order).
The "Financial history" page allows you primarily to view daily lists of (actions performed on) transactions. The "Financial history" section is mostly used for bookkeeping, as it enables easy reconciliation of transactions handled by our system with payments reported on your bank statement.
In the "Financial history" page, each operation performed on a transaction is listed separately. If you consult the payments and refunds (credit notes) of the past week, for example, a payment and refund linked to the same order (initial transaction) will be listed as two separate items (each on the day the action took place), rather than one.
In the "View transactions" result list, this will only be displayed as a single item – a refund – since only the last (final) action performed on a transaction will be shown. The details of the different operations performed on a transaction can be consulted in the order details.
The history details have a specific reference: the transaction reference in our system plus a history number 0, 1, 2, etc., e.g. 1897132/0, 1897132/1, 1897132/2.
11.2 Some search criteria
The following section contains several important criteria used looking up a transaction. For a full list of selection criteria and search results for "View transactions" and "Financial History" and more detailed information on how to consult transactions, please refer to the Support section of your Worldline account: Integration & user manuals > User Guides > How to consult and manage your payments.
11.2.1 Live vs Archives
To maxime the speed of accessing recent data, older transaction are moved to the archives database after 35 days.
You can look up the archived transactions when you tick the "Archives" Box.
11.2.2 Order date vs Payment date
The order date is the date when the original transaction was entered.
The payment date is the date when the actual financial transaction was requested. For payments or refunds, it is the date the request was sent to the acquirer/bank.
11.2.3 Different references
- Merchant reference (Merch ref): Your order reference.
- PAYID (ref): The transaction reference given by our system
- B.R.: Acquirer’s Batch Reference, i.e. the reference of the batch in which the transaction was processed on on the acquirer’s side.
- Author.: authorisation code assigned by the acquirer.
11.2.4 Statuses
Any processed transaction has a numeric status, indicating whether it was successful, declined or refunded.
Check out our dedicated guide to learn what each status means and what follow-up actions you can perform.