Prestashop
1. Introduction
Together with our certified developer Limegrow, we are proud to offer Prestashop as one of the most versatile shopping systems available:
- It supports both our Hosted Payment Page and FlexCheckout integrations
- It offers a vast selection of major international and local payment methods
- It contains hundreds of built-in features which can be extended by countless add-ons
All you need is a production account on our platform and a PrestaShop account! Get in touch with us and start your online business in no time!
2. Create Worldline account
To process transaction on our platform with Prestashop, you need an account on our platform.
Before you process live transactions, feel free to use our test environment to learn our solution without costs or any commitments involved! Prestashop will also work with our test environment, so this is a great way to get familiar with both the plugin and our platform. Once you want to go live, check out here how to get a production account or contact us!
To use this plugin, the following options need to be active in your account:
- DPR DirectLink (new transactions)
- DQY DirectLink (Query)
- DMT DirectLink (maintenance)
- D3D Direct Link 3D
- OPC (One page checkout)
Prestashop also supports the following options:
- Alias Manager (RECX) for recurring payments
- Fraud Detection Module Advanced Scoring (CAP) for scoring-based fraud detection
Please check this in your Back Office via Configuration >Account>Your options>Available options or Default Options. In case one of the options is not available in your PSPID, please contact us.
3. Install Plugin
To get started, you need to install the Prestashop module. Follow these steps to do so
- Download the module.
- Login to the Prestashop admin panel. Go to IMPROVE > Modules > Module Manager. Click on the Upload a module button. Add the file you have just downloaded in the pop-up box.
- The installation will start automatically. Once finished, a success message will be displayed
- Go to to IMPROVE > Modules > Module Manager. Scroll down to section Other. The module is now visible there
- Clean Prestashop’s cache by going to CONFIGURE > Advance Parameters > Performance. Click on the Clear Cache button.
4. Configure Plugin
After the installation you need to setup your Worldline account and the Prestashop plugin. To do so, follow these steps:
Login in to the Worldline Back Office. Set the following values in the menus and confirm by clicking on SAVE on each screen:
- Go to Configuration > Technical information > Transaction feedback > All transaction submission modes > Security for request parameters. Enter a SHA-OUT pass phrase
.png?language_id=1)
- Go to Configuration > Technical information > Transaction feedback > Direct HTTP server-to-server request and HTTP request for status changes. Select “Online but switch to a deferred request when the online requests fail.” and “For each offline status change (payment, cancellation, etc.).”
.png?language_id=1)
.png?language_id=1)
- Go to Configuration > Technical information > Data and origin verification > SHA-IN pass phrase. Enter the same SHA-OUT value from the previous step in both SHA-IN fields
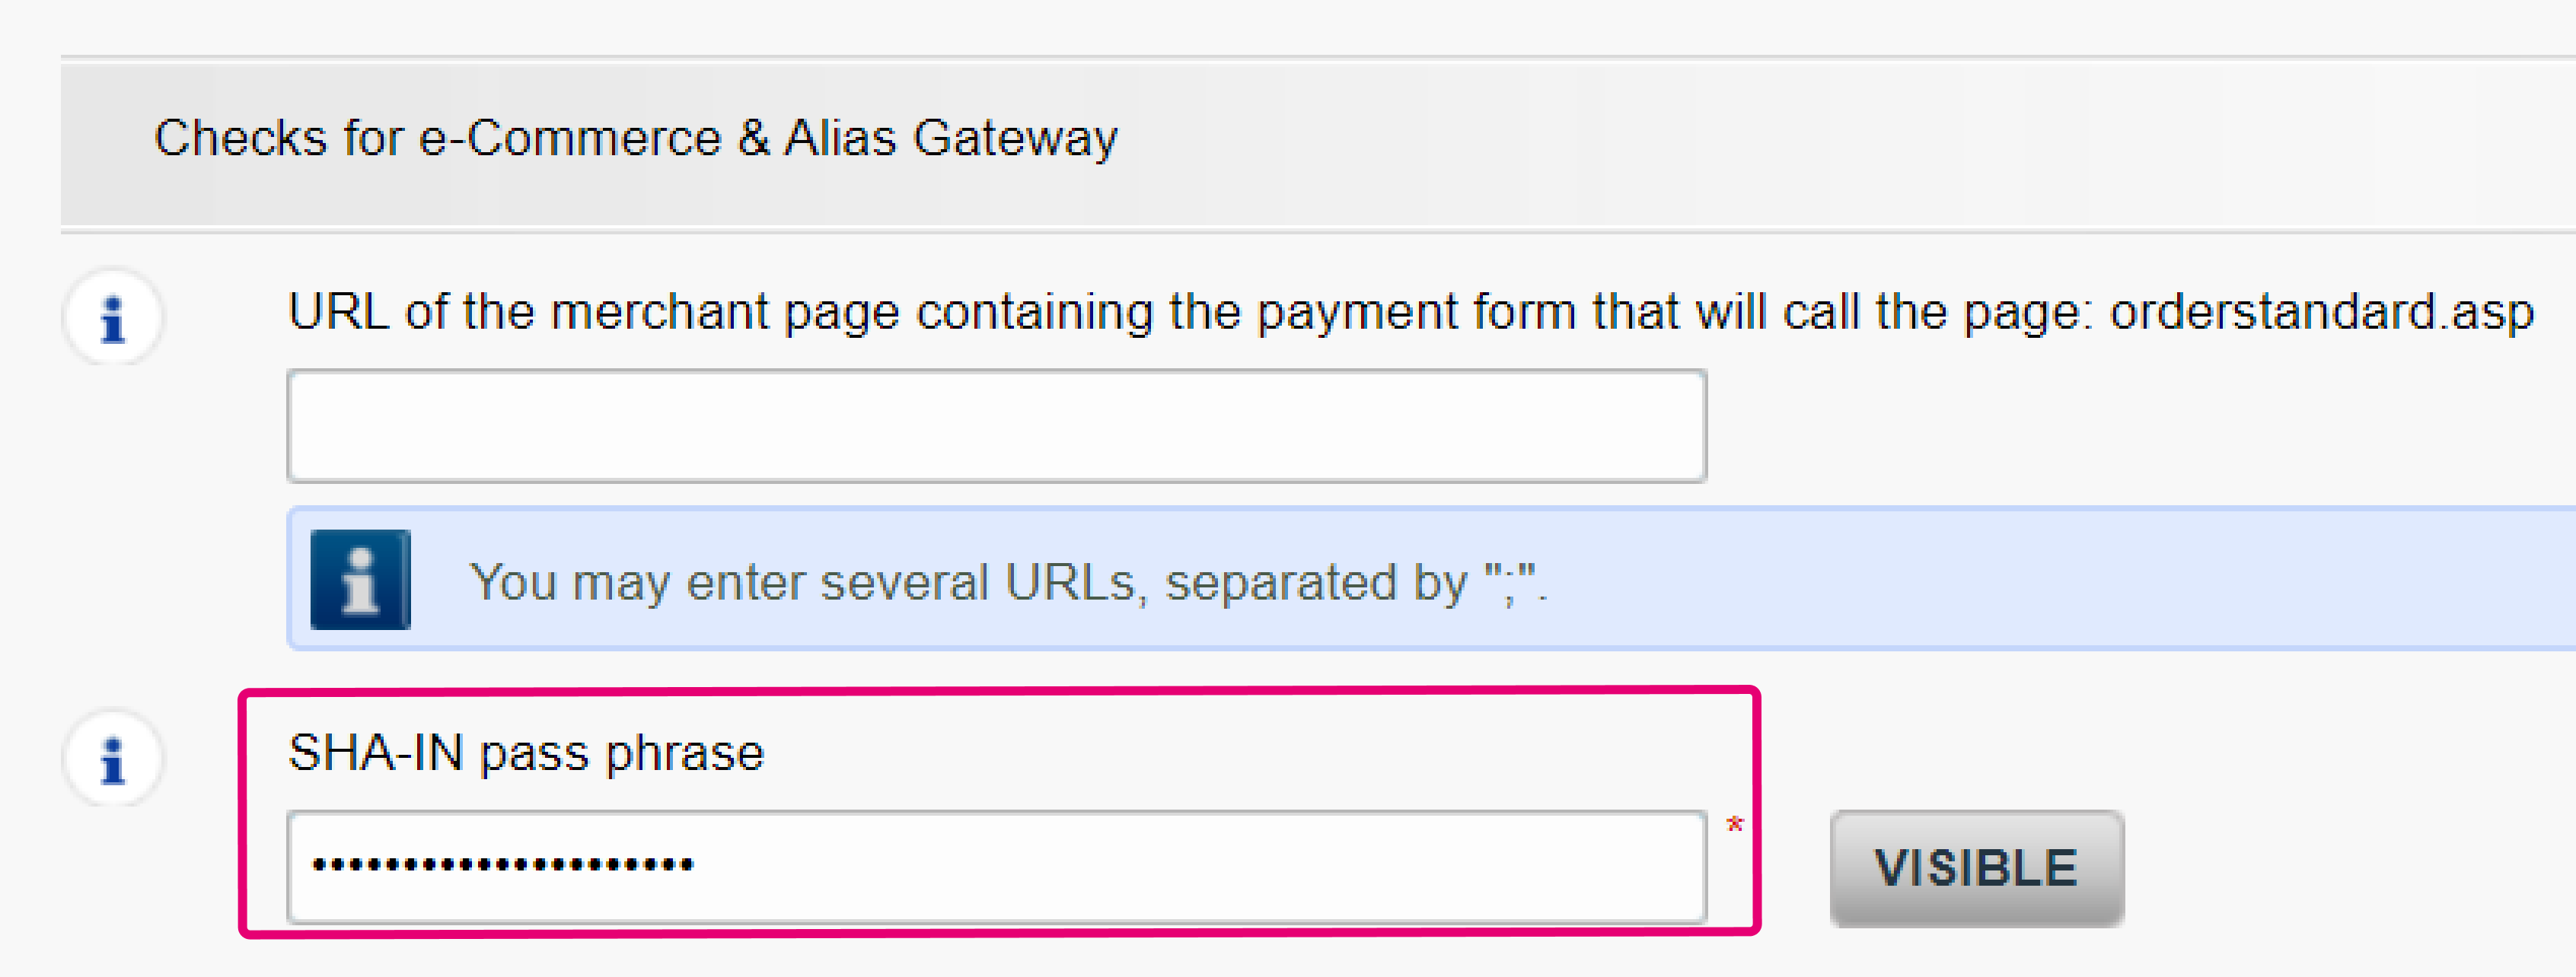
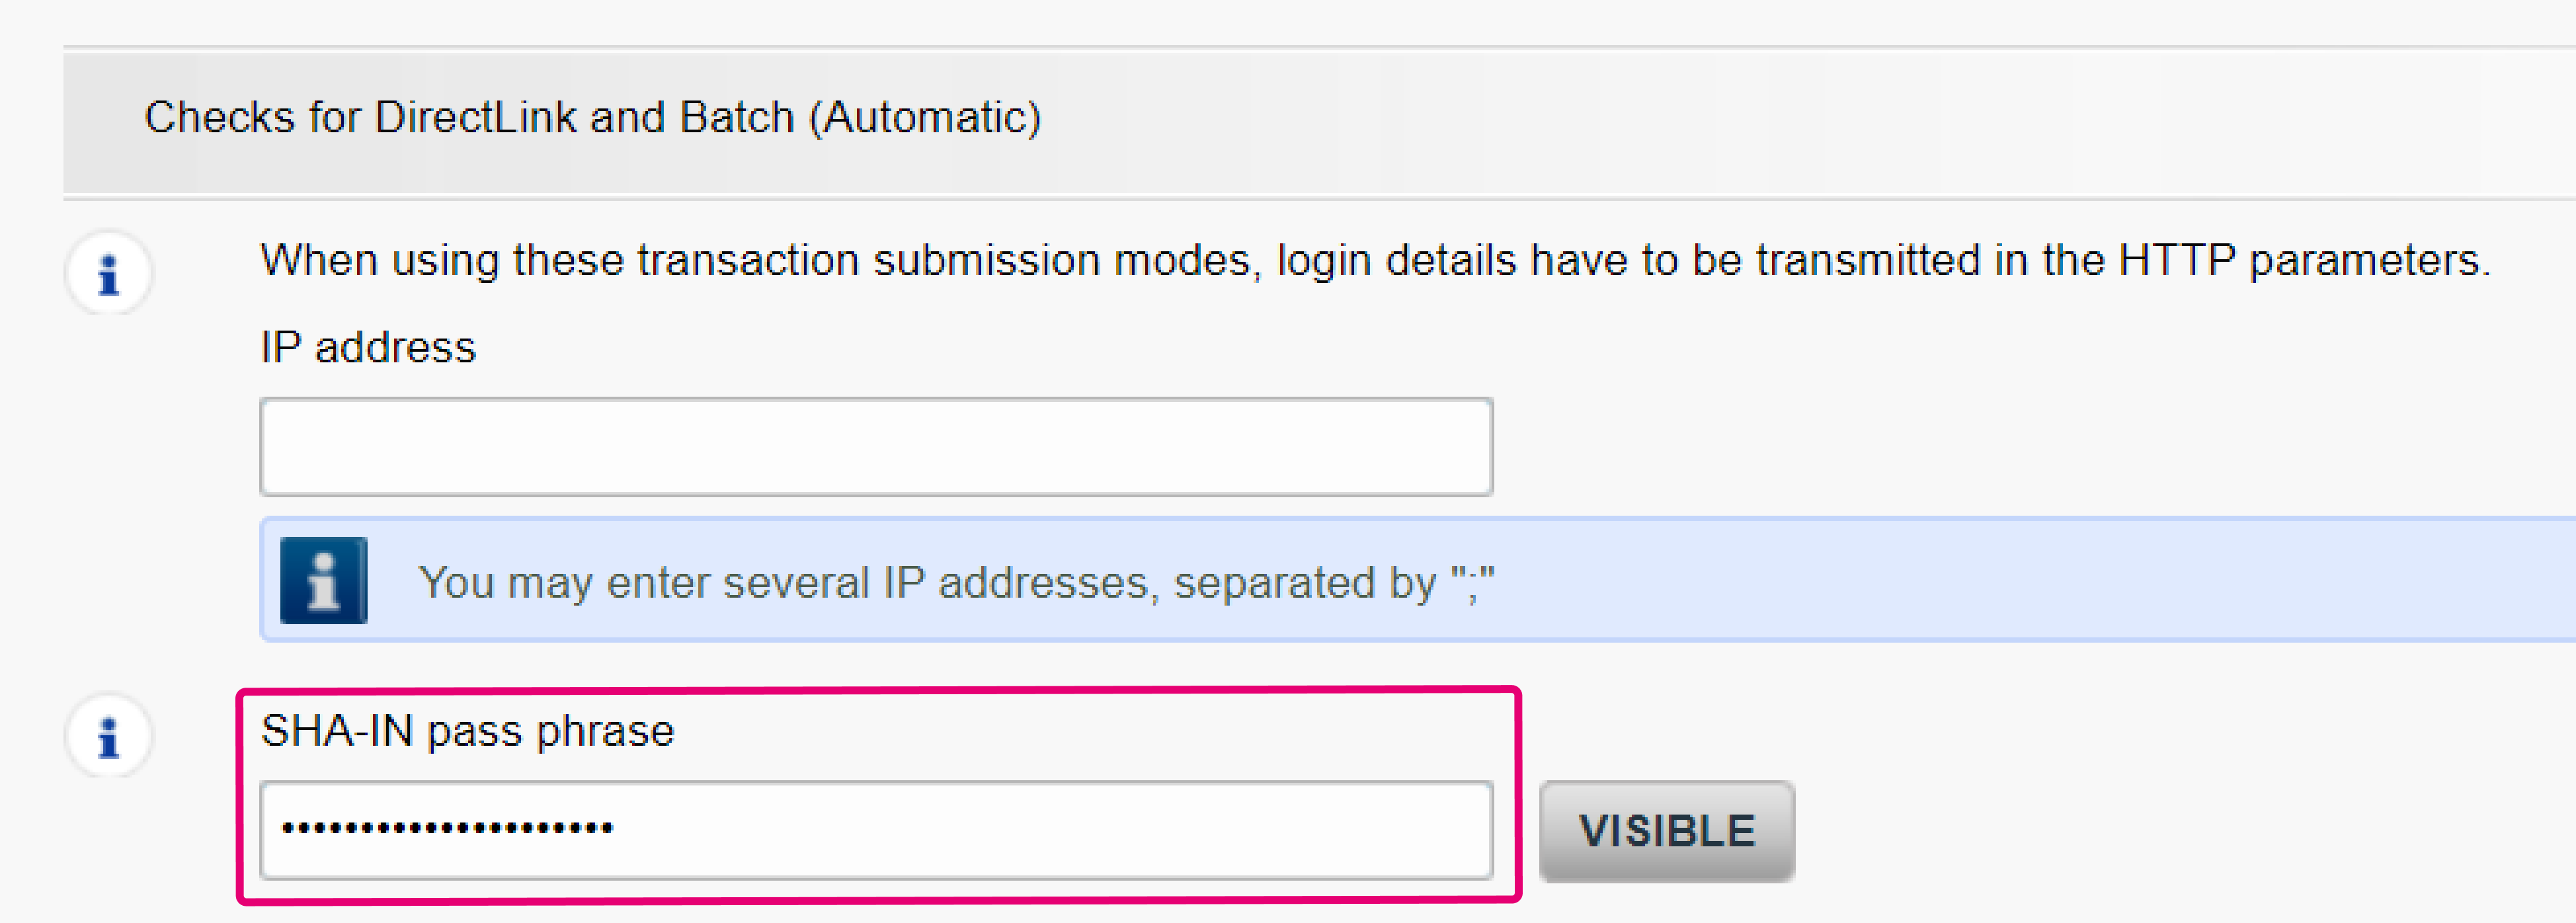
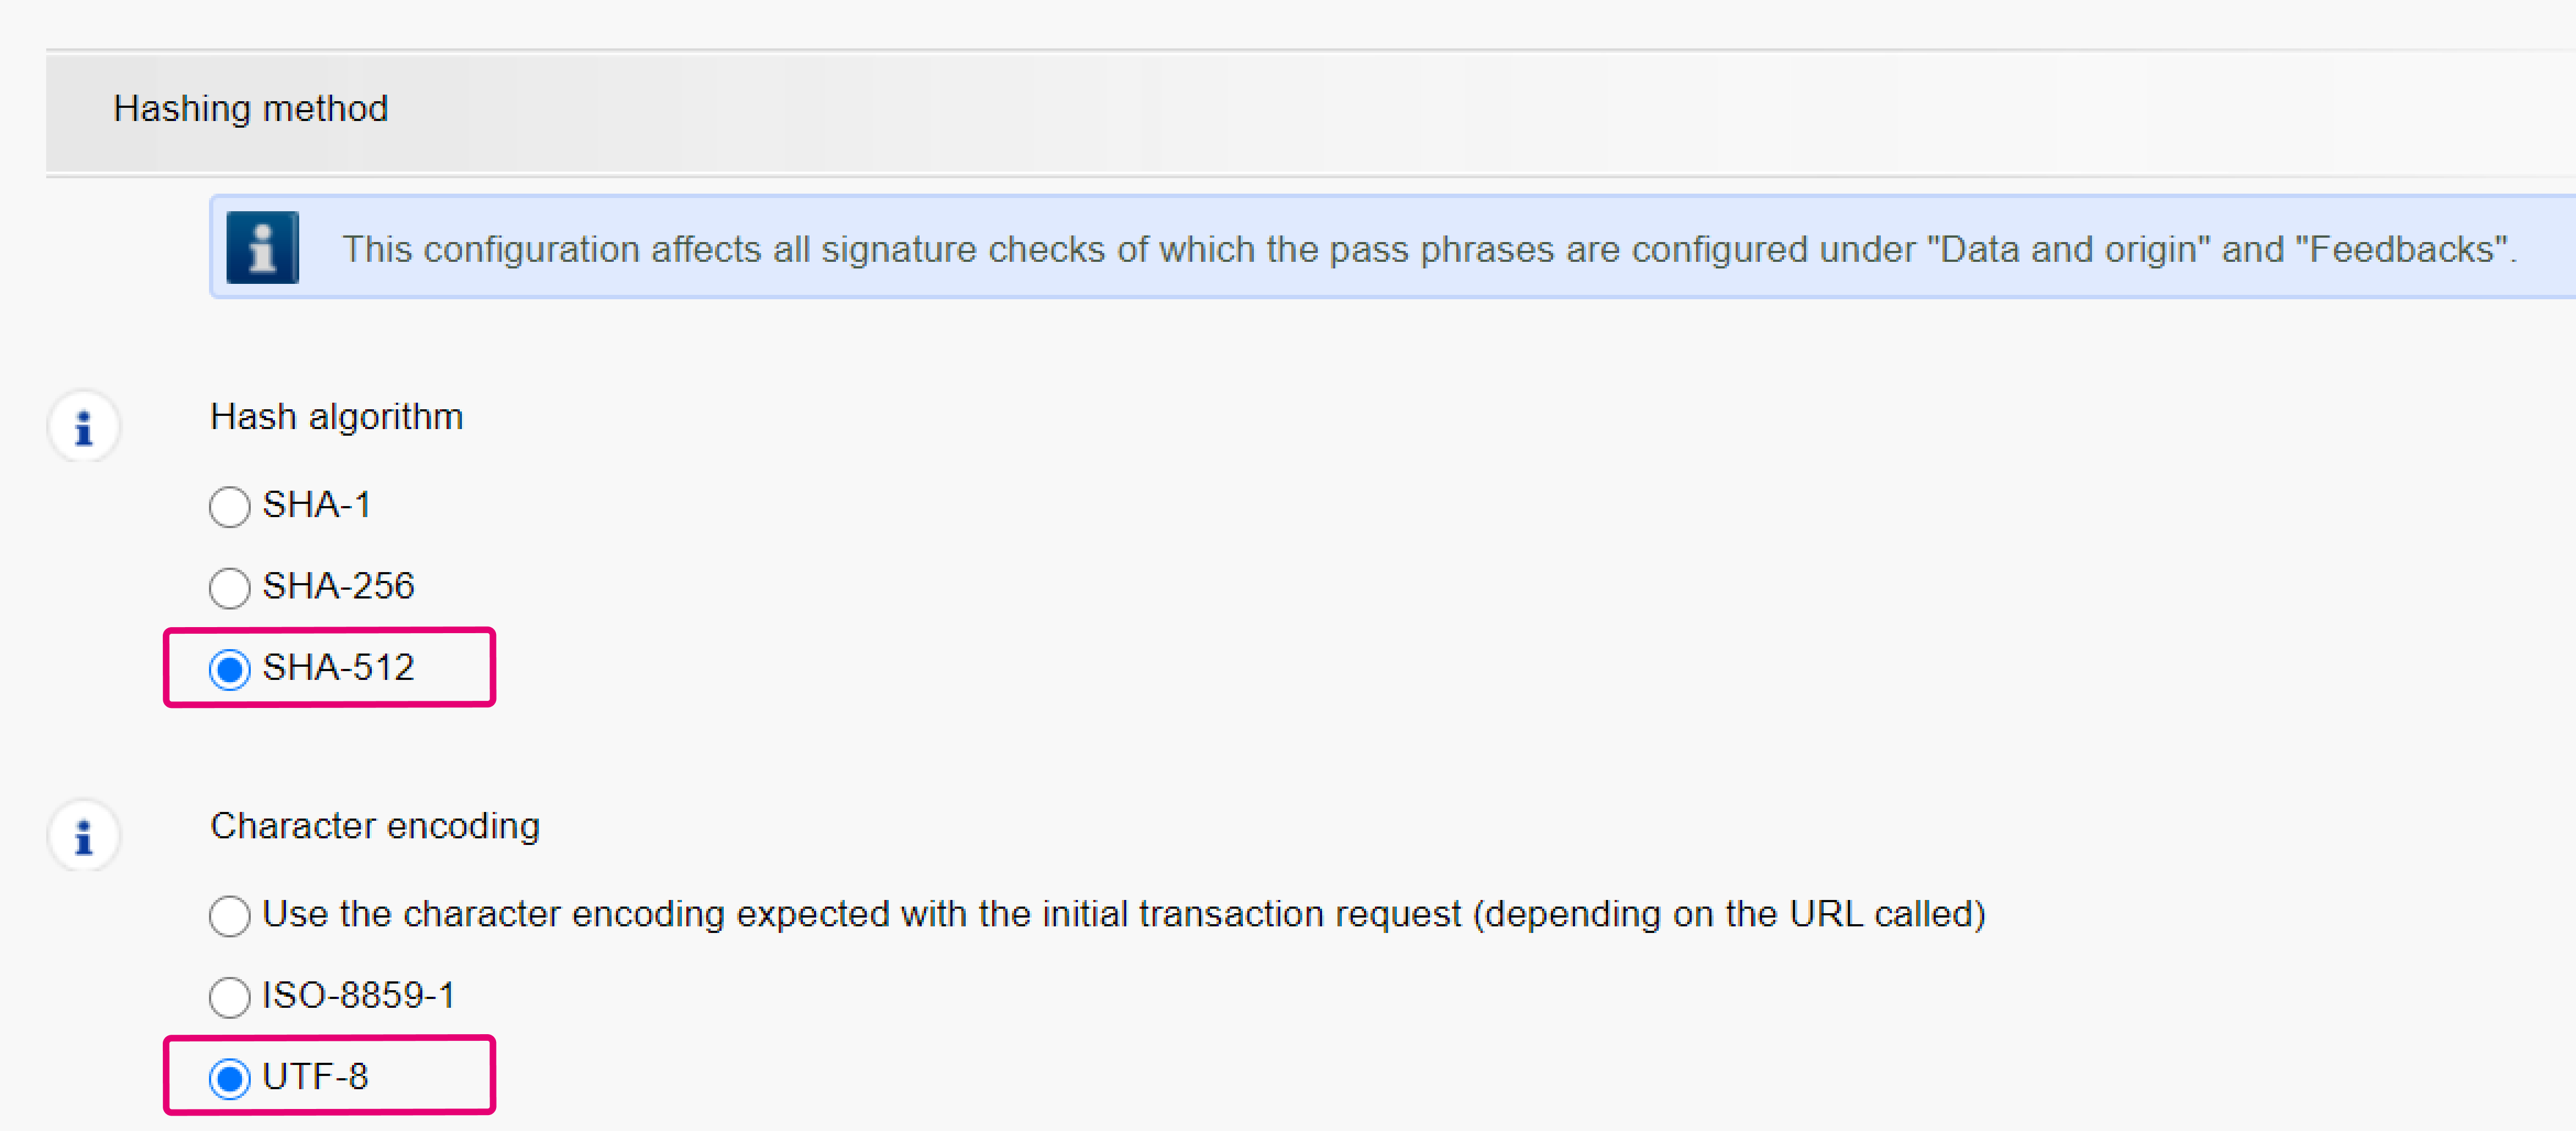
- Go to Configuration > Global security parameters. Select both SHA-512 for “Hash algorithm” and UTF-8 for “Character encoding”
- Go to Configuration > Users to create an API user. Perform this step only if do not have an API user yet.
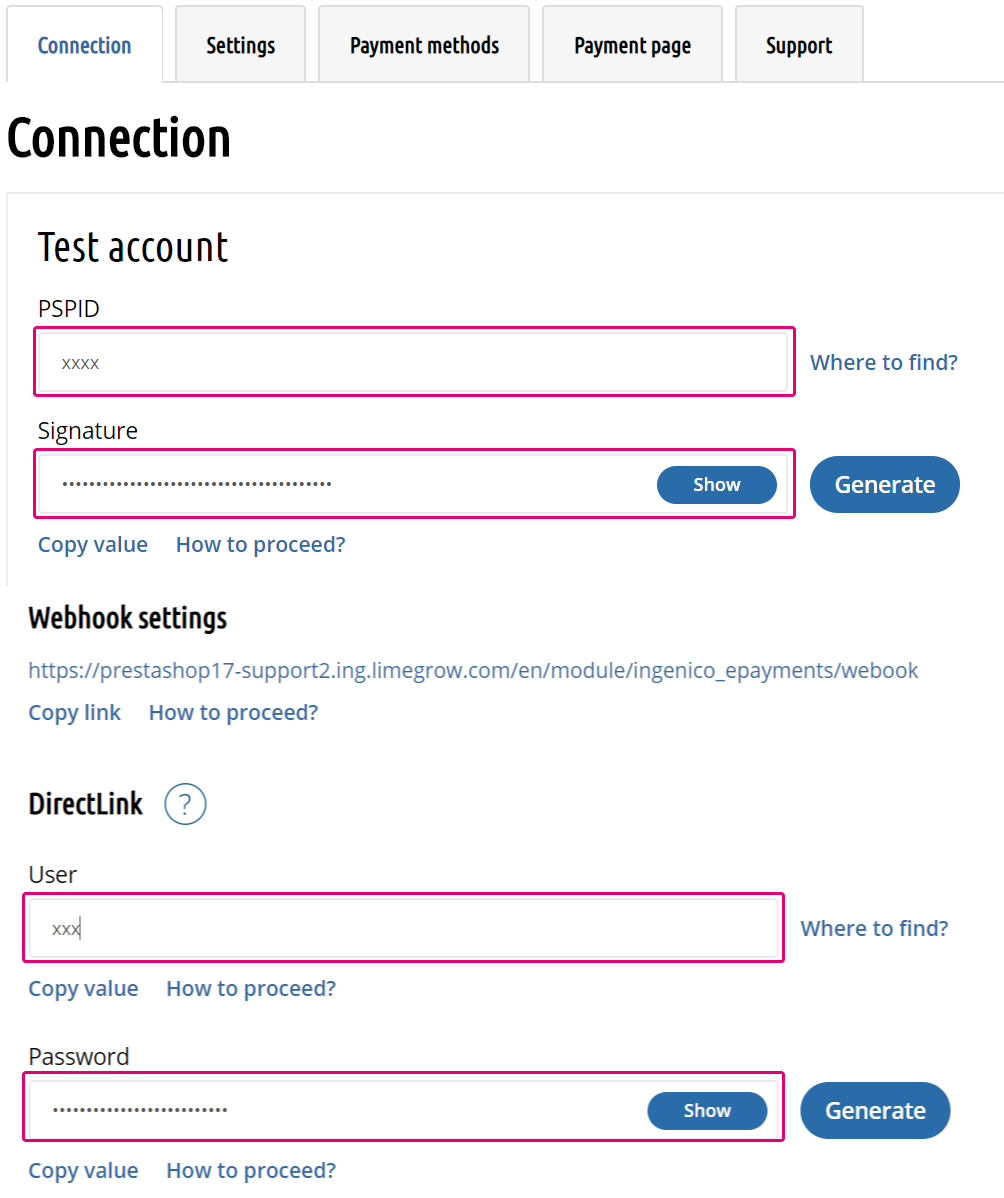
Login to the Prestashop admin panel. Go to to IMPROVE > Modules > Module Manager. Scroll down to Other. Click Configure on the module. Set the following values in the respective menus and confirm by clicking on Save in each tab.
|
The module allows you to send transactions to either our test or live environment. To select the respective mode, go to IMPROVE > Modules > Module Manager. Scroll down to section “Other”. Click “Configure” on the module. Select either “Test” or “Live”.
Make sure to switch to “Live” as soon as you have finalised your tests. |
- Go to Connection Test / Live account
| Field | Possible actions |
|---|---|
| PSPID |
The name of your account on our platform.
Please be aware that you might have different names for your account in our test / live environment. |
| Signature |
The passphrase to ensure that requests sent to our platform are legitimate orders from your shop.
This is a standard check we perform before we redirect your customers to our Hosted Payment Page or FlexCheckout form.
Check this chapter in our documentation if you want to learn more. You need to configure the exact same value you have configured in the previous step in Configuration >Technical information>Data and origin verification >Checks for e-Commerce & Alias Gateway >SHA-IN pass phrase and Configuration > Technical information > Transaction feedback>All transaction submission modes>Security for request parameters |
| Webhook settings |
Your shop’s URL to which we send the result (ie 5 - Authorised, 2 – Authorisation refused etc.) of a processed transaction. This will ensure that your store’s database will always be up-to-date.
This URL is predefined in the Prestashop module IMPROVE > Modules > Module Manager > Configure (Ingenico ePayments) > Connection > Webhook settings and needs to be added in the Back Office in Configuration > Technical information > Transaction feedback>HTTP request for status changes and HTTP request for status changes |
| Direct Link > User |
The name of a technical user profile that is needed for performing maintenance operations (ie refunds) on your transactions or FlexCheckout requests.
You can find this user in your Worldline Back Office via Configuration>Users You need to configure the exact same value in both your Prestashop account and your Ingenico Back Office. Learn how to create your API user. |
| Direct Link > Password |
The password assigned to the API user. You can define the password of the user in your Worldline Back Office via Configuration > Users
You need to configure the exact same value in both your Prestashop account and your Worldline Back Office. Learn how to create your API user. |
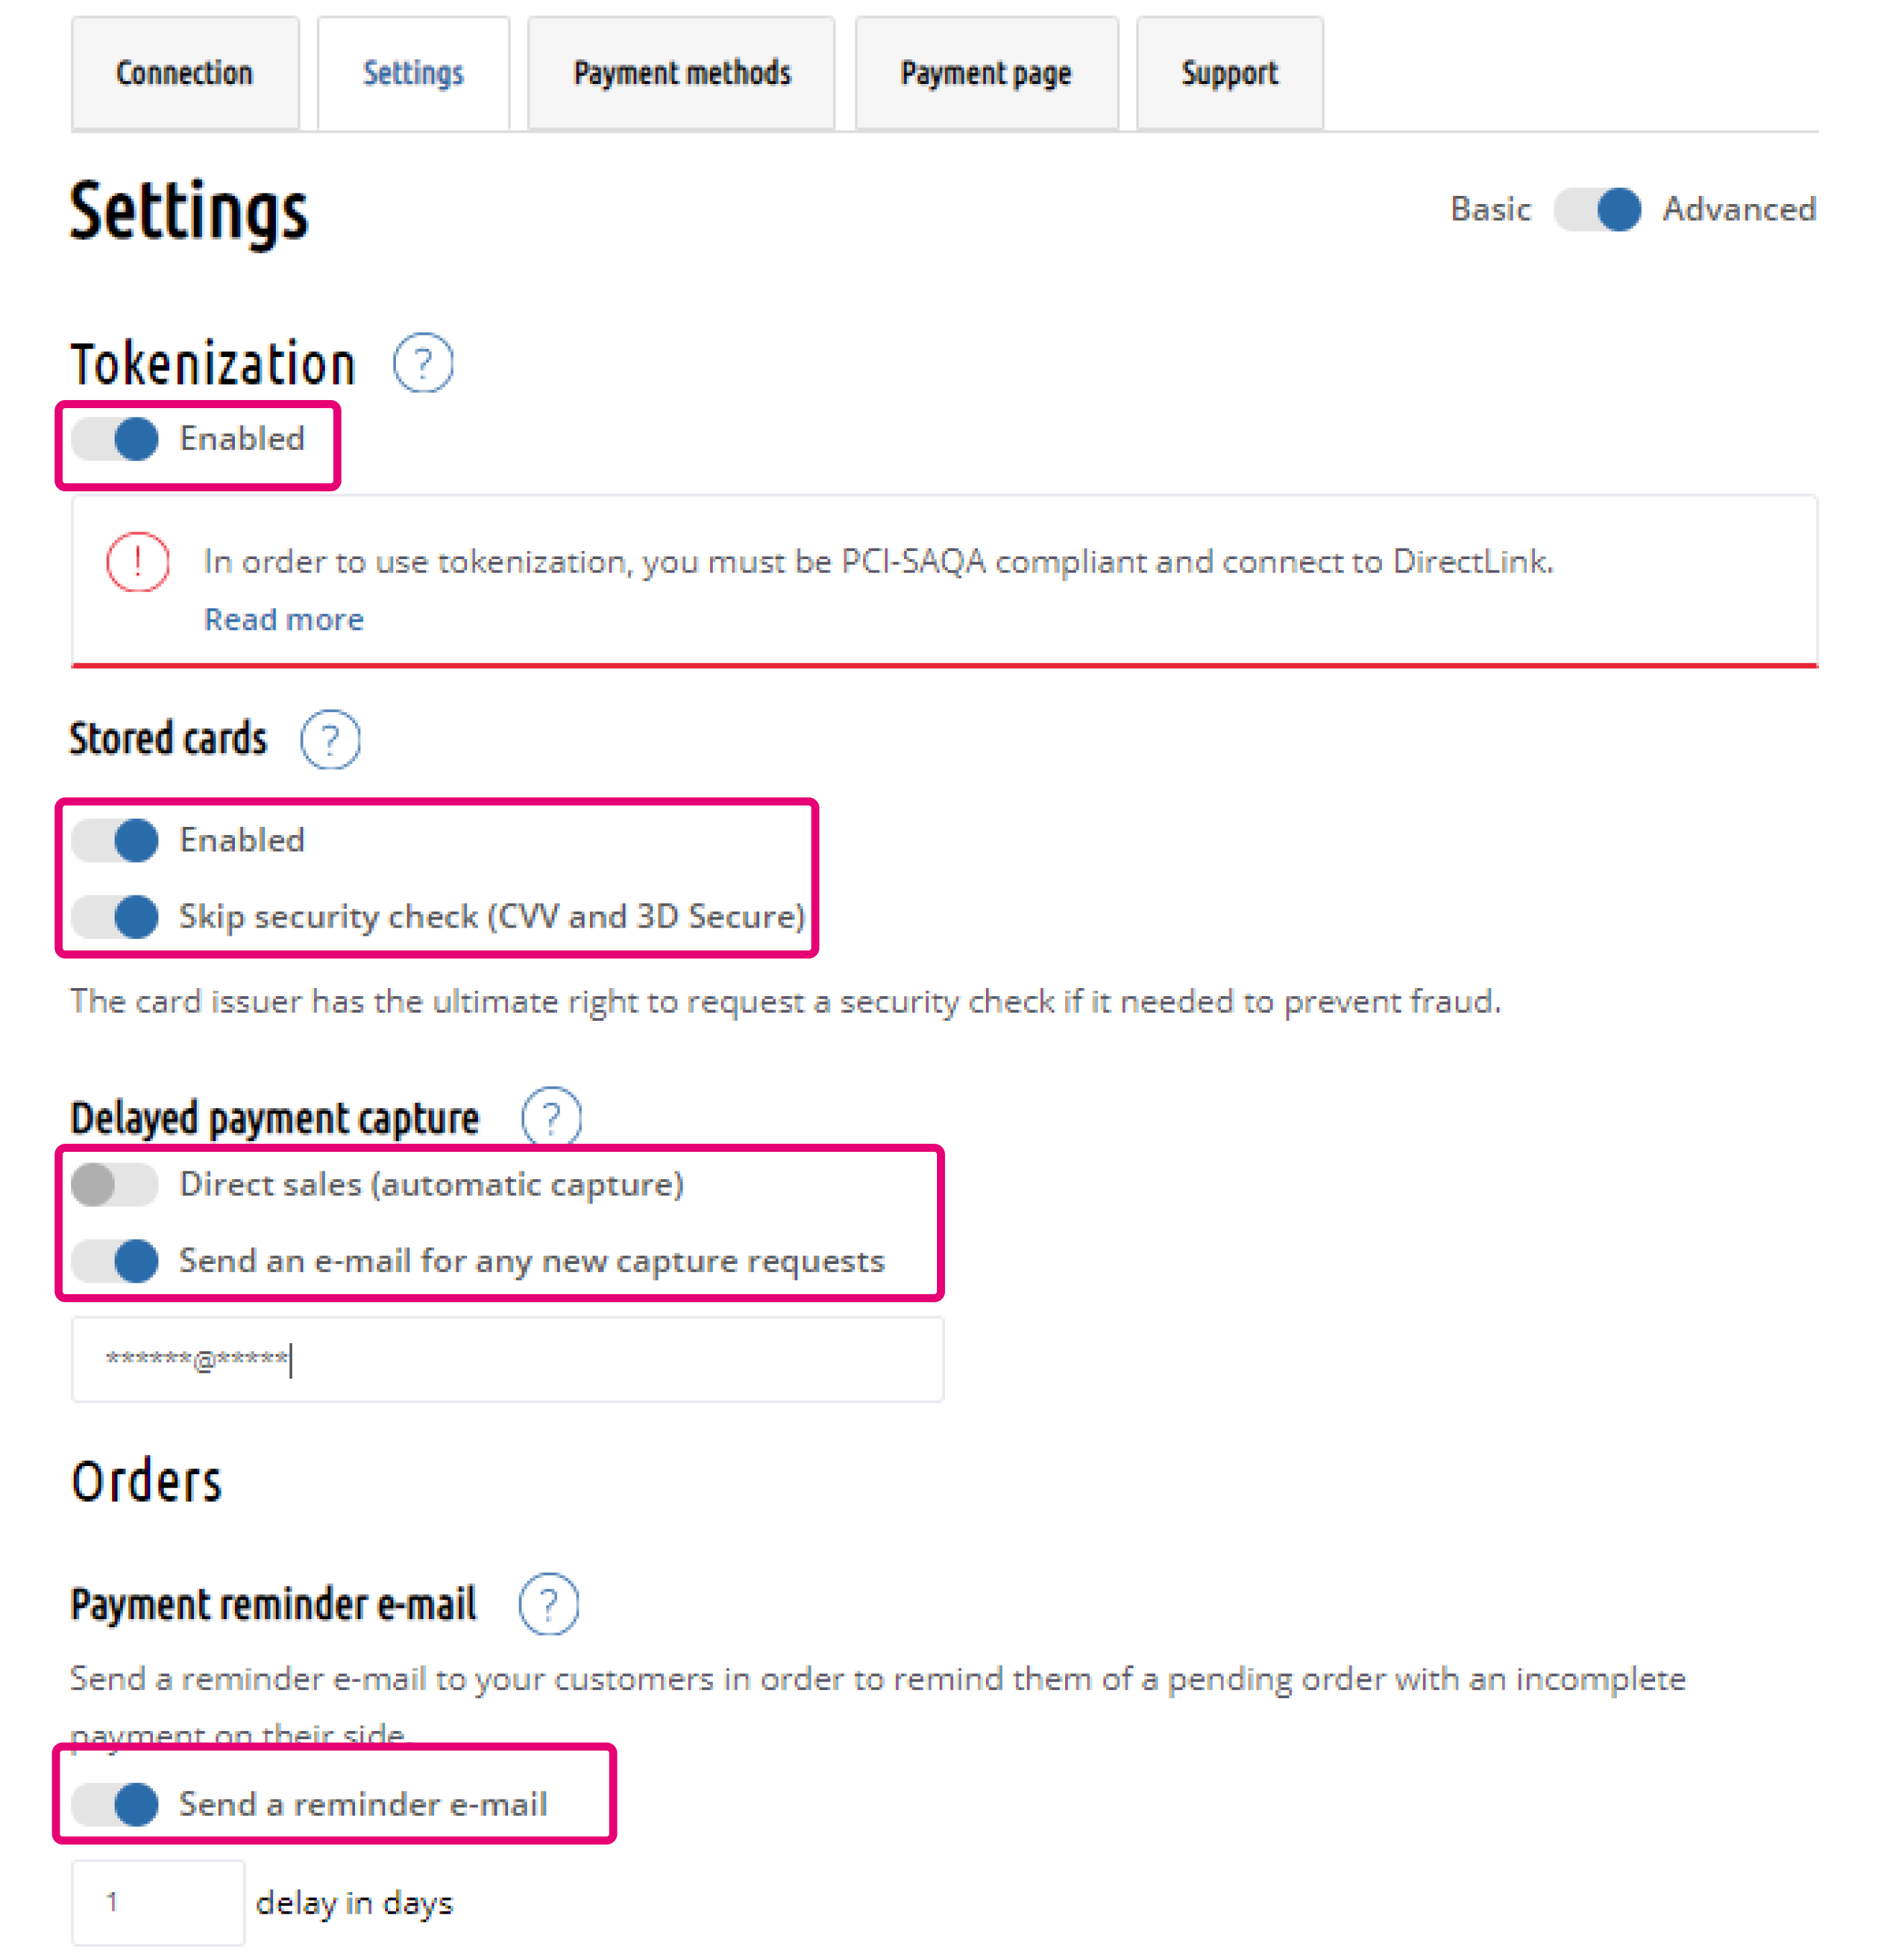
- Go to Settings
| Field | Possible actions |
|---|---|
| Tokenization | This enables your customers to profit from a seamless payment experience via our FlexCheckout solution |
| Tokenization > Stored cards |
Enabled: Our system will save your customers card data, so they will not have to re-enter them for their next purchases
To use this function, make sure that the option Alias Manager is activated in your Worldline Back Office in Configuration>Account >Your options |
| Tokenization > Skip security check (CVV and 3D Secure) |
When using Skip security check (CVV and 3D Secure)”, we will skip the 3-D secure authentication step. This ensures a maximum of seamlessness during the payment process
To use this function, make sure that the option Alias Manager (RECX) is activated in your Worldline Back Office in Configuration > Account >Your options |
| Tokenization > Delayed payment capture > Direct sales (automatic capture) |
Define whether to process the transactions as authorisations only or as direct sale
Enabled: Our system will automatically capture authorisations. Successful transactions will have status 9 – payment requested.
Not enabled: The amount is only blocked on your customer's card. Successful transactions will have status 5 - authorised and remain so until you capture them by yourself.
If you choose “No”, make sure that you capture your transactions later. Only then the transaction will reach status 9, for which you receive the payment for the transaction. Please check our dedicated guide on how to do this. |
| Tokenization > Delayed payment capture > Send an e-mail for any new capture requests | Get a reminder email from our platform for any transaction that has not been captured yet. |
| Orders > Payment reminder email | Choose whether the Prestashop module will send a reminder to your customers after X “days in days” for unpaid orders. |
5. Select payment methods
Finally, you need to add the payment methods you want to offer to your customers. To do so, follow these steps:
- Login to the Worldline Back Office. Go to Configuration > Payment methods to check active payment methods. You can add them to your Magento account via the next steps
- Login to the Prestashop admin panel. Go to to IMPROVE > Modules > Module Manager. Scroll down to section Other. Click Configure on the module. Click on the Payment methods tab. Click on Add payment method and add each payment method you would like to offer to your customers.
Once both are configured, Our payment page will present automatically all these payment methods to your customers during the checkout process, whether you have opted for Hosted Payment Page or for FlexCheckout mode.
6. Customise your payment page
Make sure your customer goes all the way until the payment thanks to a customized payment page.
Learn how to do it here for the Hosted Payment Page (Redirection) and here for FlexCheckout (Inline payment).