Magento 2
1. Introduction
Together with our certified developer Limegrow, we are proud to offer Magento as one of the most versatile shopping system available:
- It supports both our Hosted Payment Page and FlexCheckout integrations
- It offers a vast selection of major international and local payment methods
- A dedicated community that will help you to max out Magento’s possibilities
- And the best of all: It’s free of charge!
Check out our documentation and start selling today!
2. Create Worldline account
To process transaction on our platform with Magento, you need an account on our platform.
Before you process live transactions, feel free to use our test environment to learn our solution without costs or any commitments involved! Magento will also work with our test environment, so this is a great way to get familiar with both the plugin and our platform.
Once you want to go live, check out here how to get a production account or contact us!
To use this plugin, the following options need to be active in your account:
- DPR DirectLink (new transactions)
- DQY DirectLink (Query)
- DMT DirectLink (maintenance)
- D3D Direct Link 3D
- OPC (One page checkout)
If you want to offer recurring payments to your customers, make sure that option Alias Manager (RECX) is also active.
Please check this in your Back Office via Configuration > Account >Your options>Available options or Default Options.
In case one of the options is not available in your PSPID, please contact us.
3. Install Plugin
To get started, you need to install the Magento module. We offer you two ways to do so:
- Install via Composer from Magento Marketplace
We recommended to install the module from the repository. This makes later updates on the module easier for you.
If you have downloaded the free-of-charge module on the Magento® Marketplace, use the Magento® repository to install the module with Composer.
Follow these steps:
- Download the module
- Log in via SSH
- Navigate to the root folder of your Magento installation
- Execute:
composer require ingenico/m2-payment - You may have to enter authentication keys of the cuser who purchased the module on the Marketplace. For more information checkhere
- Check if any errors occurred at this point. If necessary, resolve them
- Execute:
php bin/magento module:enable Ingenico_Paymentphp bin/magento setup:upgrad - If your shop is running in production mode, then also execute:
php bin/magento setup:di:compile
php bin/magento setup:static-content:deploy
B. Install via Composer from ZIP archive
Follow these steps:
- Download the module
- Create a folder in the root directory of your Magento installation. Name it i.e.local_packages
- Upload ZIP archive into that folder
- If not already logged in, Log in via SSH
- Navigate to the root folder of your Magento® installation
- Execute following command, where given path is a full server path of the folder containing ZIP archive with module. Make sure not to unzip the archive!
- Check if any errors occurred at this point. If necessary, resolve them.
Execute
composer config repositories.ingenico artifact /full/server/path/to/local_packages/
composer require ingenico/m2-payment- If your shop is running in “production” mode, then also execute:
php bin/magento setup:di:compile
php bin/magento setup:static-content:deploy
|
4. Configure Plugin
After the installation you need to setup your Worldline account and the Magento plugin. To do so, follow these steps:
Login in to the Worldline Back Office. Set the following values in the menus and confirm by clicking on SAVE on each screen:
- Go to Configuration > Technical information > Transaction feedback>All transaction submission modes > Security for request parameters. Enter a SHA-OUT pass phrase
.png?language_id=1)
- Go to Configuration> Technical information > Transaction feedback > Direct HTTP server-to-server request and HTTP request for status changes. Select “Online but switch to a deferred request when the online requests fail.” and “For each offline status change (payment, cancellation, etc.).”
.png?language_id=1)
.png?language_id=1)
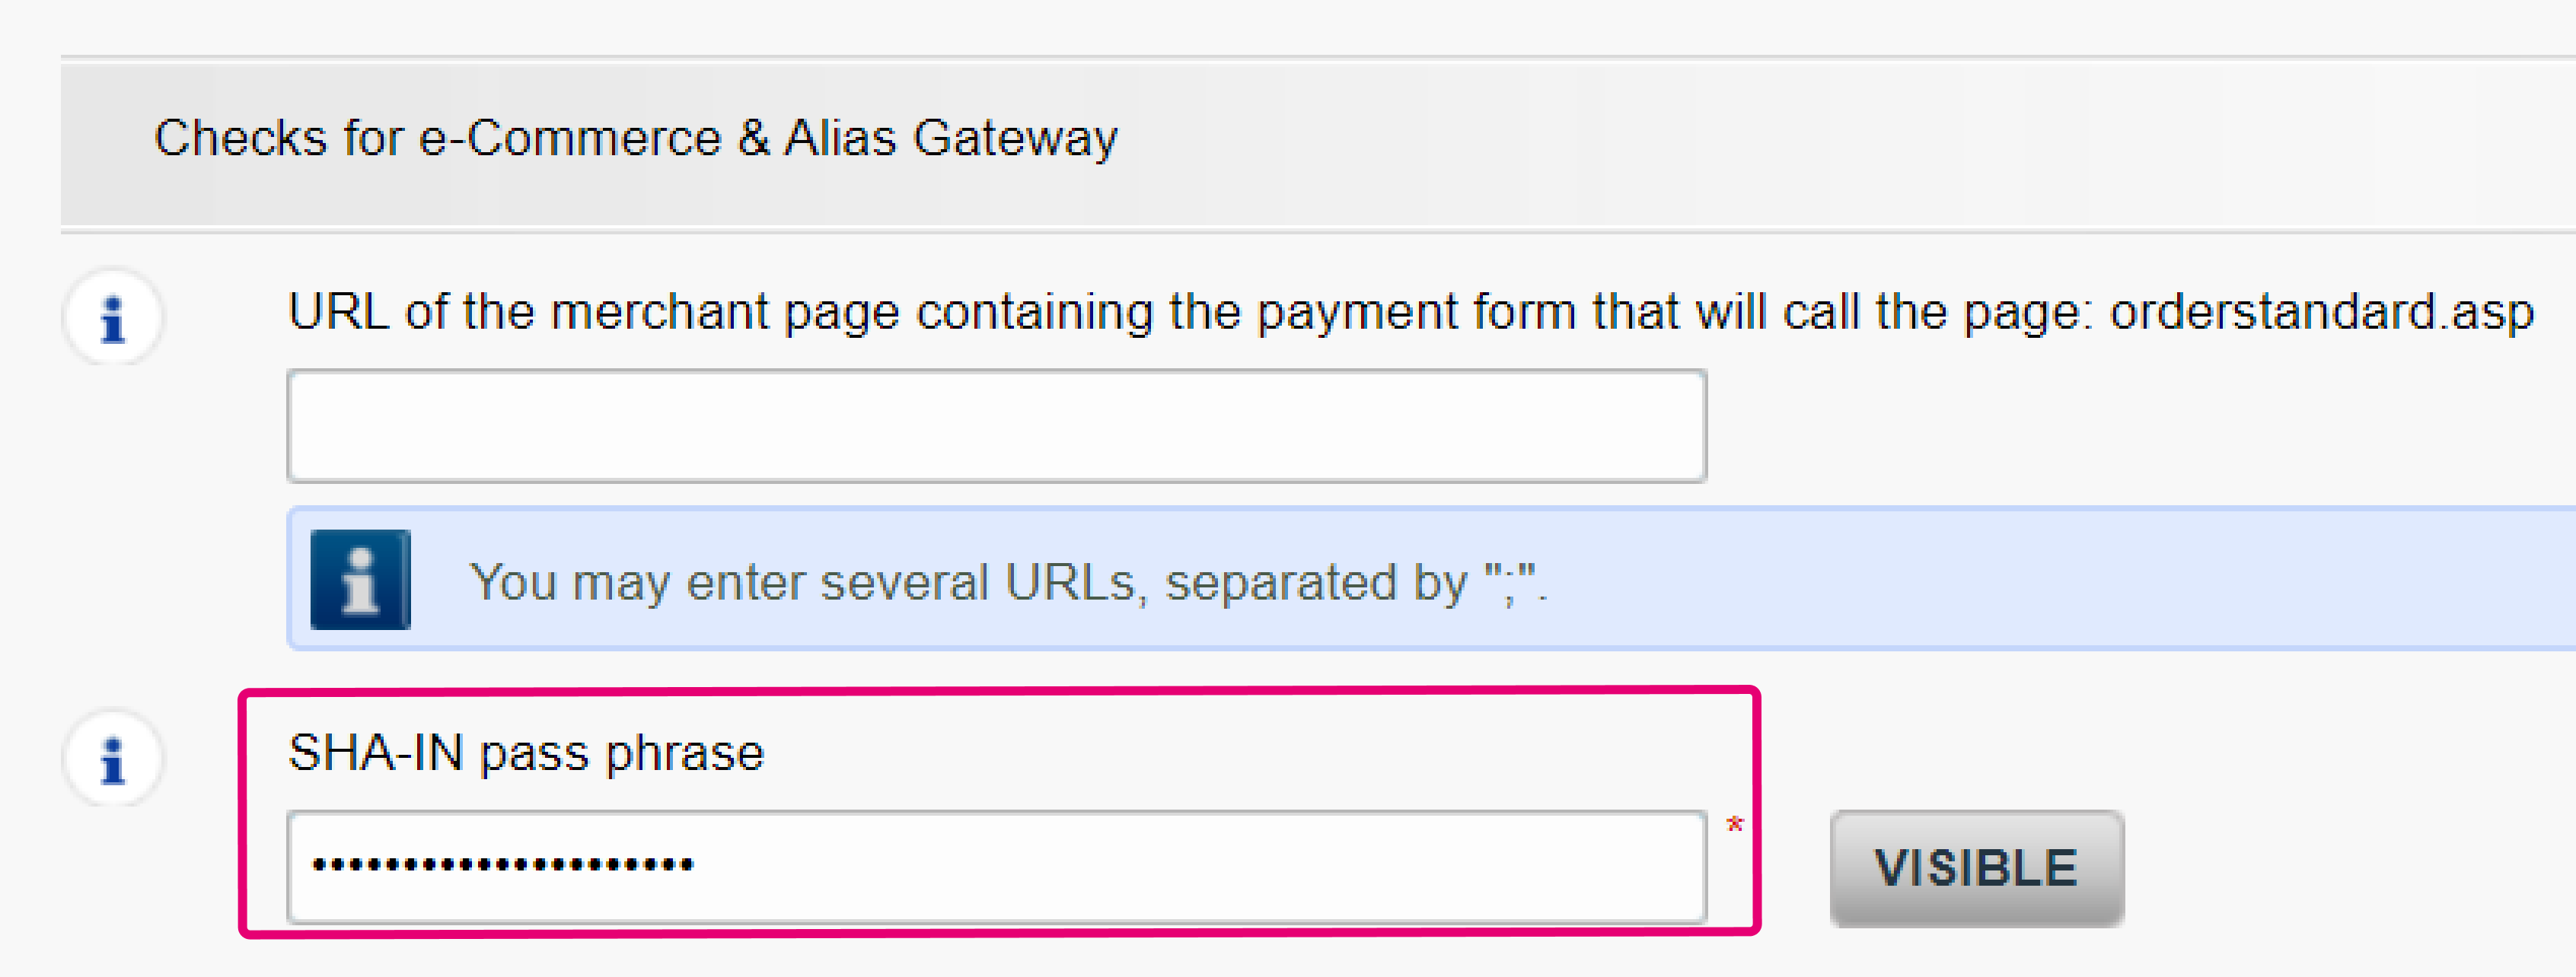
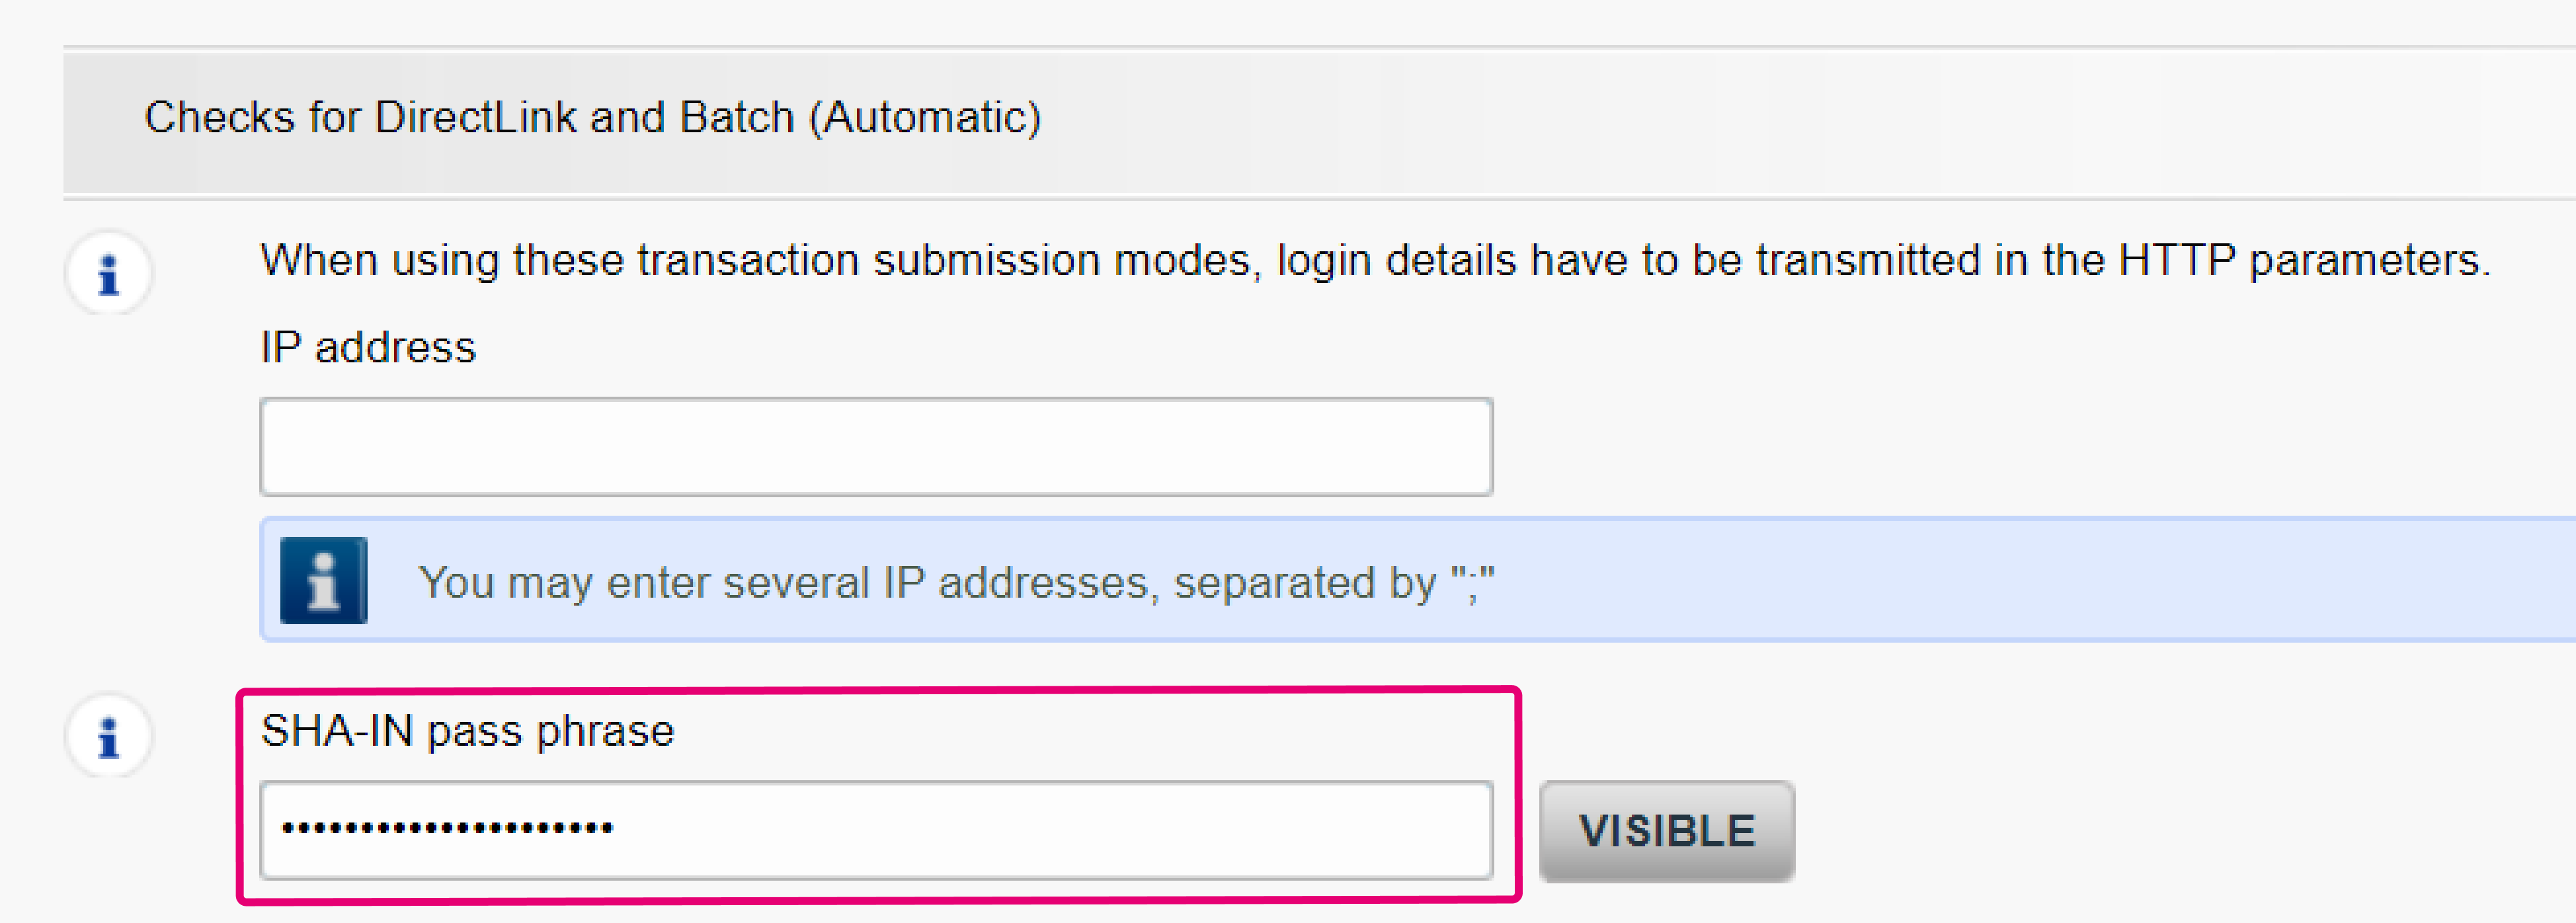
- Go to Configuration > Technical information > Data and origin verification > SHA-IN pass phrase. Enter the same SHA-OUT value from the previous step in both SHA-IN fields
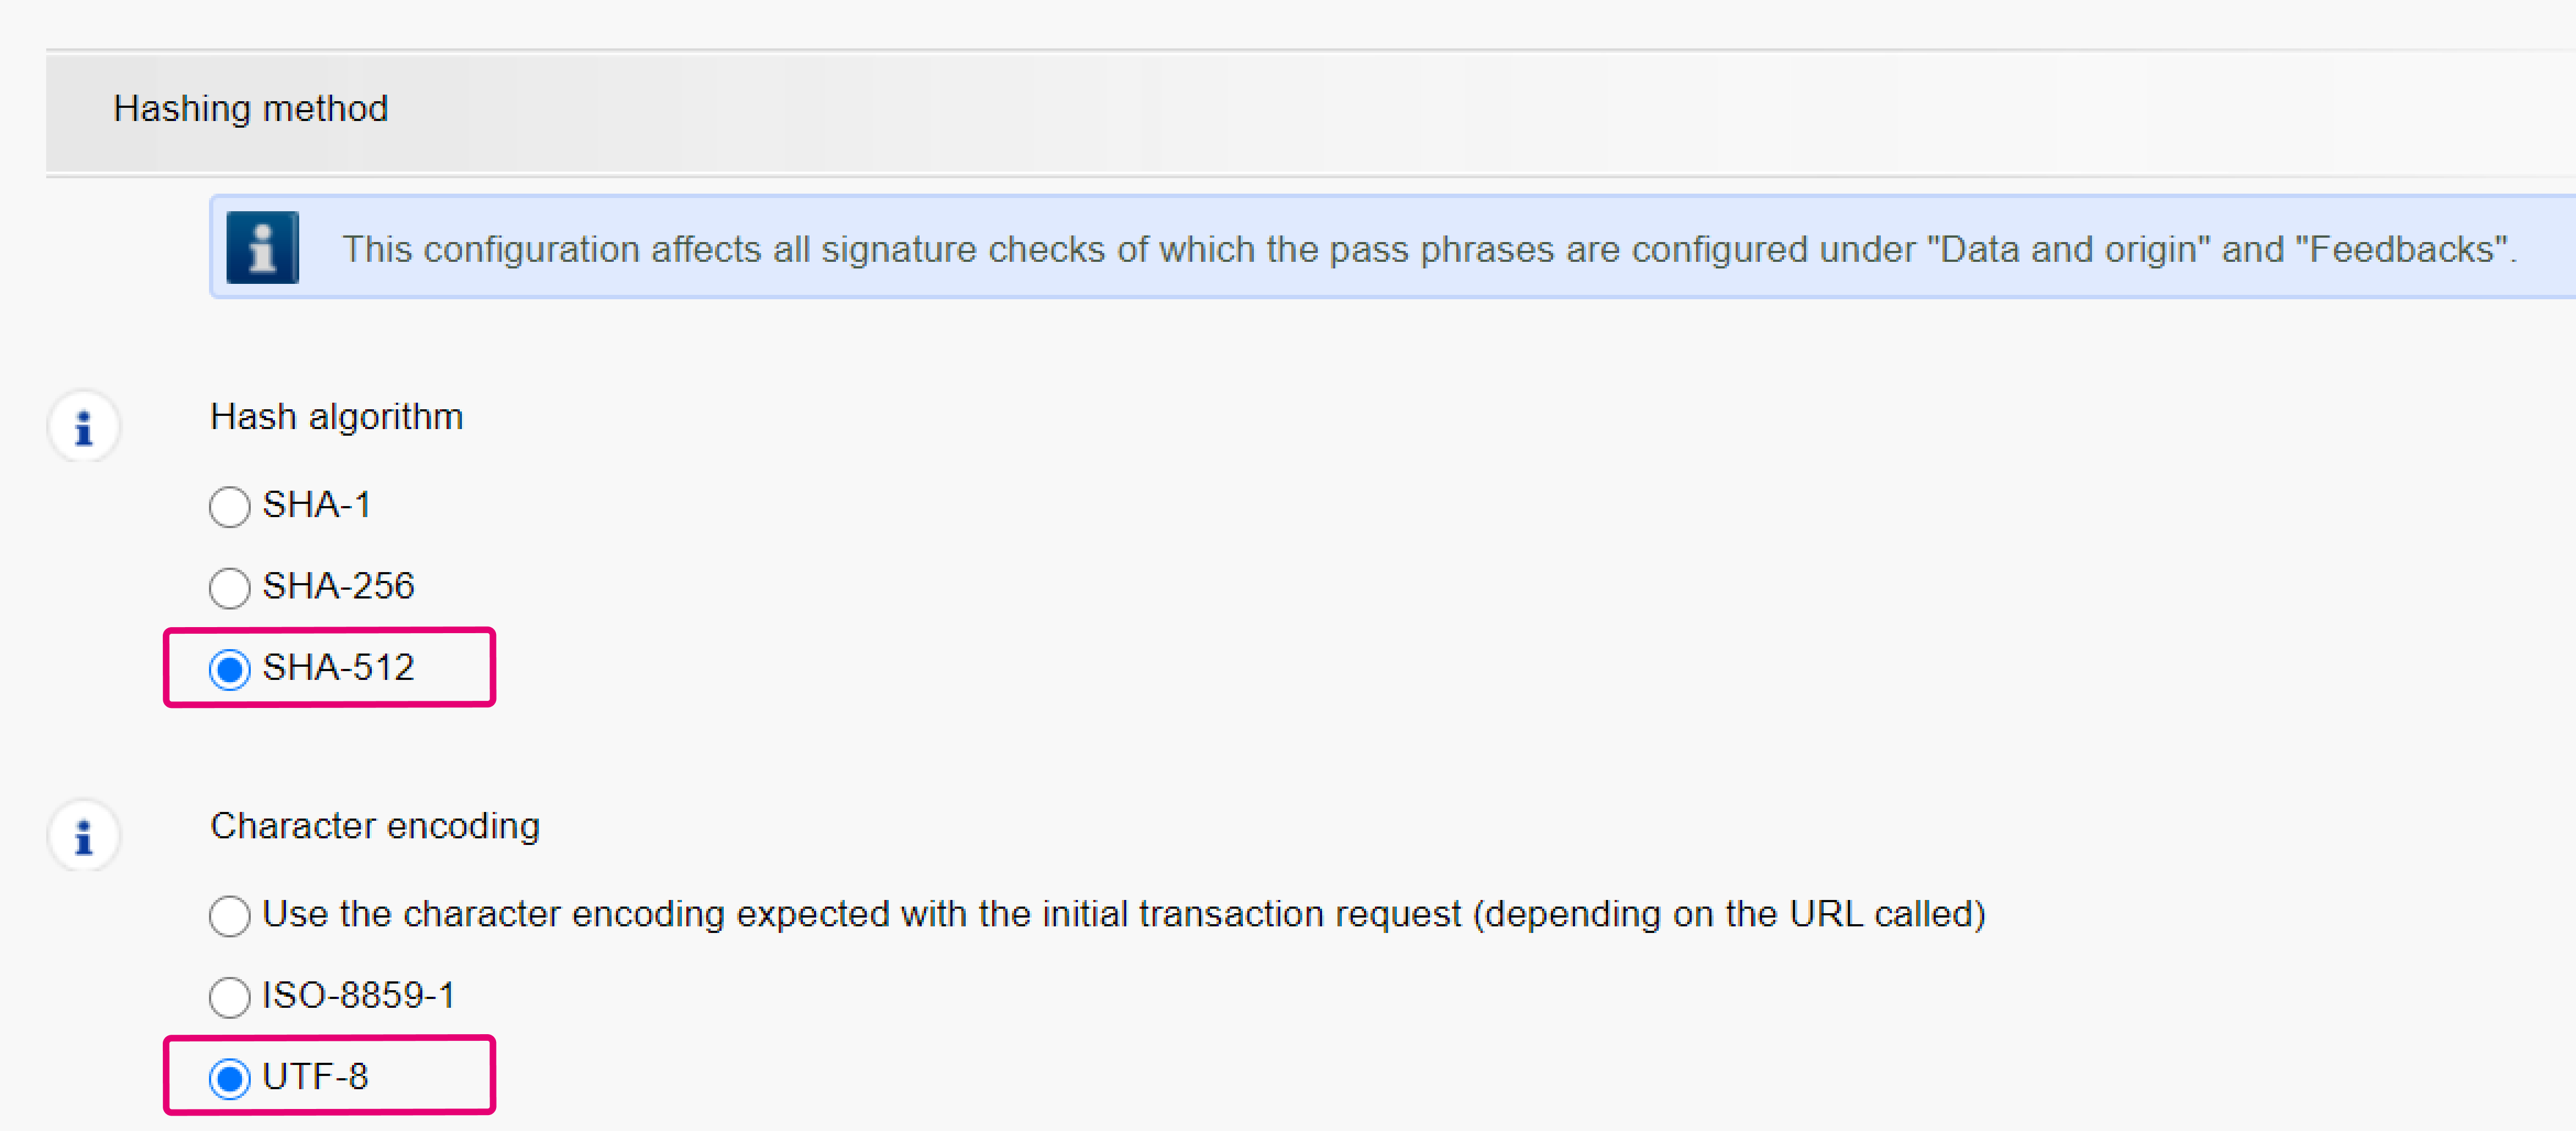
- Go to Configuration> Global security parameters. Select both SHA-512 for “Hash algorithm” and UTF-8 for “Character encoding”
- Go to Configuration > Users to create an API user. Perform this step only if do not have an API user yet.
Login to your Magento admin panel. Set the following values in the respective menus and confirm by clicking on “Save Config” on each screen.
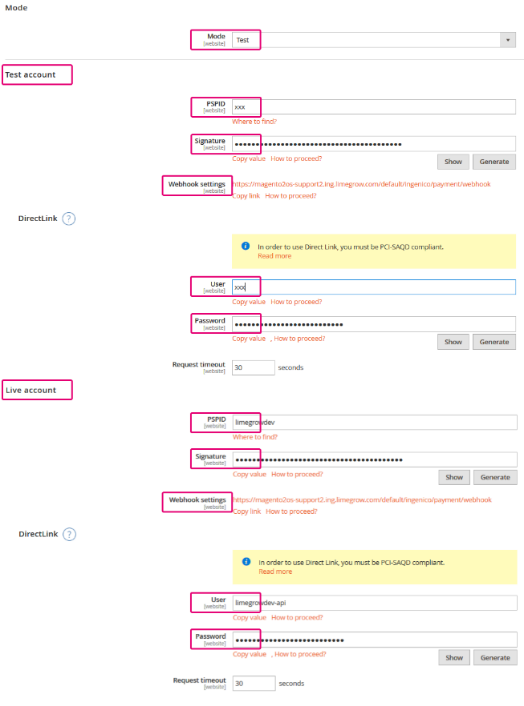
- Go to Stores > Configuration > Ingenico ePayments > Connection. Configure the following fields for both test and live environment
| Field | Possible actions |
|---|---|
| Mode |
For test transactions with no financial impact, select “Test”. The transactions will be sent to our test environment and thereby to your test account
For real transactions with financial impact, select “Live”. The transactions will be sent to our live environment thereby to your live account.
Make sure to switch to “Live” as soon as you have finalised your tests. |
| Test / Live account > PSPID |
The name of your account on our platform.
Please be aware that you might have different names for your account in our test / live environment.
Make sure to enter the name of the account of the respective environment you have configured in the “Mode” field |
| Test / Live account > Signature |
The passphrase to ensure that requests sent to our platform are legitimate orders from your shop.
This is a standard check we perform before we redirect your customers to our Hosted Payment Page or FlexCheckout form.
Check this chapter in our documentation if you want to learn more. You need to configure the exact same value you have configured in the previous step in Configuration > Technical information > Data and origin verification > Checks for e-Commerce & Alias Gateway > SHA-IN pass phraseandConfiguration > Technical information > Transaction feedback > All transaction submission modes > Security for request parameters |
| Test / Live account > Webhook settings | Your shop’s URL to which we send the result (ie 5 - Authorised, 2 – Authorisation refused etc.) of a processed transaction. This will ensure that your store’s database will always be up-to-date. |
| Test / Live account > User |
The name of a technical user profile that is needed for performing maintenance operations (ie refunds) on your transactions.
You can find this user in your Worldline Back Office via Configuration > Users
You need to configure the exact same value in both your Magento account and your Worldline Back Office. Learn here how to create your API user. |
| Test / Live account > Password |
The password assigned to the API user. You can define the password of the user in your Worldline Back Office via Configuration > Users
You need to configure the exact same value in both your Magento account and your Worldline Back Office. Learn here how to create your API user. |
- Go to Stores > Configuration > Ingenico ePayments > Settings. Configure the following fields according to your preferences:
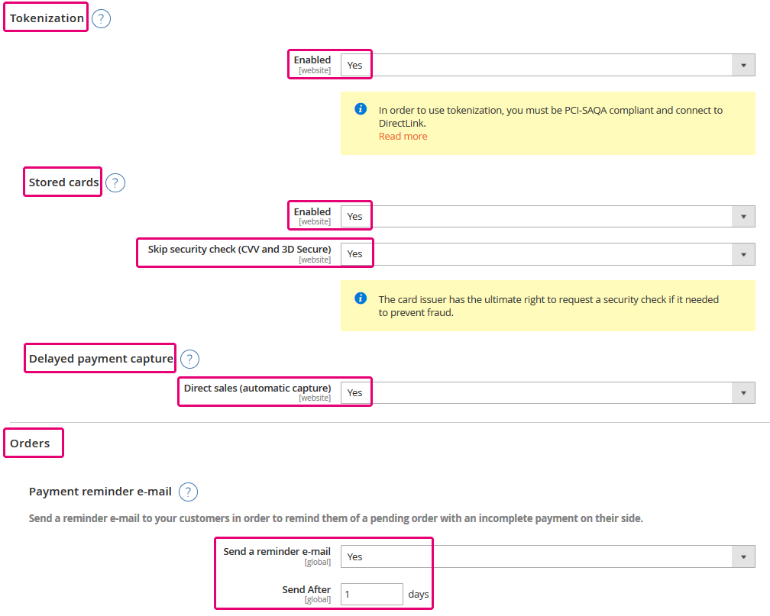
| Field | Possible actions |
|---|---|
| Tokenization – Enabled | Set to “Yes”. This enables your customers to profit from a seamless payment experience via our FlexCheckout solution |
| Stored cards – Enabled |
Our system will save your customers card data, so they will not have to re-enter them for their next purchases
To use this function, make sure that the option Alias Manager is activated in your Worldline Back Office in Configuration >Account >Your options |
| Stored cards – Skip security check (CVV and 3D Secure) |
When using ” Stored cards – Enabled”, we will skip the 3-D secure authentication step. This ensures a maximum of seamlessness during the payment process
To use this function, make sure that the option Alias Manager (RECX) is activated in your Worldline Back Office in Configuration> Account > Your options |
| Delayed payment capture – Direct sales (automatic capture) |
Define whether to process the transactions as authorisations only or as direct sale
Yes: Our system will automatically capture authorisations. Successful transactions will have status 9 – payment requested. No: The amount is only blocked on your customer's card. Successful transactions will have status 5 - authorised and remain so until you capture them by yourself.
If you choose “No”, make sure that you capture your transactions later. Only then the transaction will reach status 9, for which you receive the payment for the transaction. |
| Orders - Send a reminder e-mail / Send After X days | Choose whether the Magento module will send a reminder to your customers after X days for unpaid orders. |
- Make sure to fully restart and invalidate the the Magento cache before you start testing/processing live transactions
- This will guarantee the SHA calculation for your requests work as intended
5. Select payment method
Finally, you need to add the payment methods you want to offer to your customers. To do so,
follow these steps:
- Login to the Worldline Back Office. Check via Configuration > Payment methods for active payment methods. You can add all those to your Magento account via the next steps
- Login to the Magento admin panel. Go to Stores >Configuration > IngenicoePayments > Payment methods. Select “Enabled – Yes” for each payment method you would like to offer to your customers.
Once both are configured, Our payment page will present automatically all these payment methods to your customers during the checkout process, whether you have opted for Hosted Payment Page or for FlexCheckout mode.
6. Customise your payment page
Make sure your customer goes all the way until the payment thanks to a customized payment page.
Learn how to do it here for the Hosted Payment Page and here for FlexCheckout.